Have you ever wondered why some outdoor spaces feel more inviting than others? The secret often lies in the details, like a beautifully designed walkway. Learning how to lay pavers for walkway projects can transform your home’s exterior, creating a path that is both functional and visually appealing.
Adding a stunning walkway to your property is not just about aesthetics; it’s a project that enhances curb appeal and ensures long-term durability. Whether you opt for classic stones or modern pavers, a well-constructed path can significantly elevate your landscape design.
At St. Clair Landscaping and Irrigation, we understand the nuances of this rewarding endeavor. Our professional team is ready to help you achieve your dream project with expertise and high-quality service. Don’t hesitate to contact us today for a consultation!
Key Takeaways
- A well-planned walkway adds significant value to your home.
- Professional installation prevents common issues like shifting.
- Choose between classic and modern pavers for your design.
- Ensure proper drainage to protect your foundation.
- Consulting with experts can simplify the process.
Planning Your Walkway Project

Creating a stunning walkway starts with careful planning and design. Before you begin, assess your garden area. This will help you determine the best path trajectory while ensuring proper drainage for rainwater runoff.
Selecting the right materials is crucial. Concrete pavers offer a contemporary look, while cut stone provides a traditional feel for your landscape. Additionally, consider the specific pattern of your pavers. Irregular flagstones require more time to fit together than standard precast concrete units.
Landscape designer Zach Hammaker of ZH Design notes that gravel is an excellent choice for maintaining porosity and addressing drainage issues. St. Clair Landscaping and Irrigation recommends selecting high-quality stones that complement your home’s architecture. This ensures a cohesive and beautiful finished garden path.
Proper planning helps avoid costly mistakes. Make sure your chosen materials are sufficient for the entire installation process. For more insights on enhancing your outdoor space, check out our front yard landscaping services.
Preparing the Site for Installation

Before you can enjoy your new path, preparing the site is essential. Start by clearing the area of all debris. This includes removing any plants, rocks, or unwanted vegetation. Next, dig a trench that is between 4 and 10 inches deep. This depth will accommodate a firm layer of base rock.
Cathy Edger of Edger Landscape Design recommends a 3- to 4-inch layer of base rock. This layer provides a solid surface that supports heavy loads. A well-prepared base is crucial for the stability of your walkway.
Using a plate compactor, level the soil and the paver base. This step prevents the path from sinking or shifting over time. Establishing a solid foundation is vital, as it dictates the long-term durability of your stone walkway.
At St. Clair Landscaping and Irrigation, we utilize professional-grade equipment to ensure every base is perfectly level before laying the final pavers. Proper preparation of the bed involves compacting the gravel thoroughly, creating a stable surface that supports the weight of the pavers above.
Our team follows these critical steps to ensure your edging is secure and your path remains perfectly level throughout the entire installation process. For more information on our services, visit our hardscaping page.
Step-by-Step Process: how to lay pavers for walkway

A well-executed pathway can greatly enhance the charm of your outdoor space. The process involves several essential steps that ensure both functionality and beauty. First, you’ll need to focus on spreading the base rock and sand layers.
Spreading the Base Rock and Sand Layers
Start by spreading a layer of base rock and compact it thoroughly. This foundation is crucial for a stable surface. After that, add a 2-inch layer of sand. This layer will provide a smooth setting surface for your pavers.
Arranging and Leveling the Pavers
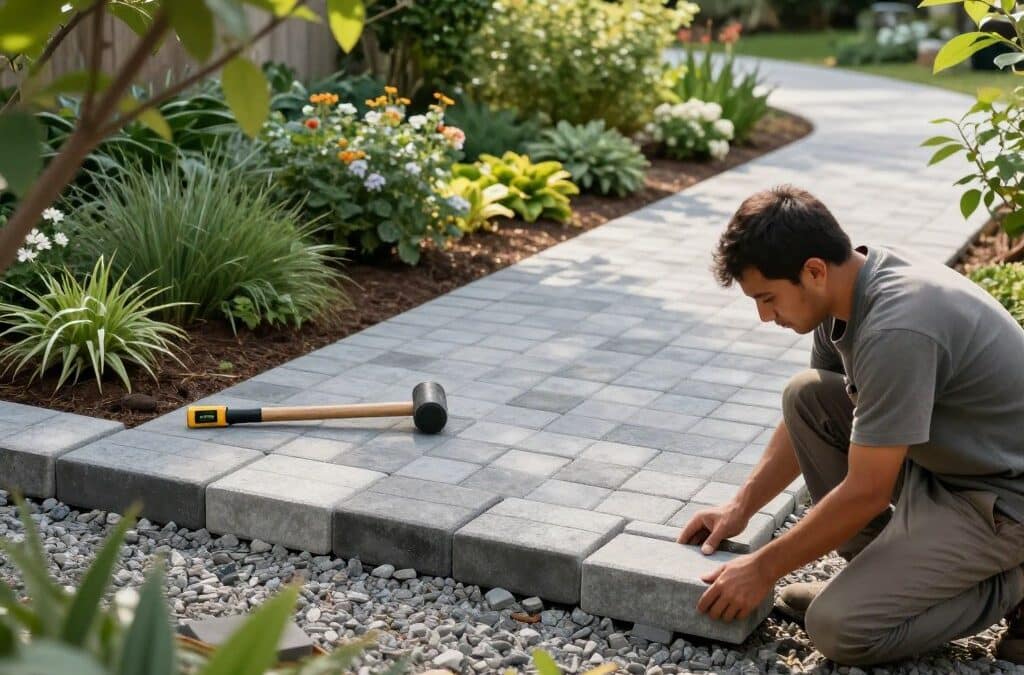
When arranging your pavers, make sure to use a string line. This helps keep your pattern straight and ensures the width of the path remains consistent. St. Clair Landscaping and Irrigation utilizes a 14-inch plate compactor to lock the stones into the sand, creating a durable surface.
Next, install plastic edging along the path’s edge and secure it with spikes. This prevents the pavers from shifting over time. Filling the joints with sand is also vital, as it stabilizes the pavers and helps prevent weeds from growing.
Our team carefully cuts pavers to fit the lines of your design. By following these steps, we ensure that your paver walkway is built to last, providing a beautiful and functional surface for your home. For more insights on enhancing your outdoor space, visit our design services page.
Enhancing Durability and Aesthetic Appeal

The foundation of a long-lasting walkway lies in the careful selection and application of materials. One key technique involves applying a layer of gravel that is typically between 1 and 4 inches deep. This gravel not only covers the base but also surrounds the pavers, providing stability and support.
To enhance durability, we carefully rake the gravel, ensuring a smooth surface around your beautiful stone pavers. St. Clair Landscaping and Irrigation uses high-quality edging to keep your gravel in place, preventing it from migrating onto the paver surface.
We also make sure the gravel is not too thick, which helps create surface friction against the base to keep the stones secure. Installing artificial grass between pavers is a popular design choice that requires precise cutting for a perfect fit within the joints.
Our team utilizes a plate compactor to settle the final layer, ensuring that every stone is locked into place for a long-lasting walkway. We recommend using jagged-edged gravel, as these stones lock together better than rounded pea gravel, providing a much firmer surface for walking.
Proper edging techniques, such as using plastic or metal, are essential for maintaining the clean lines of your walkway for many years to come. For more information on hardscaping services, check out our hardscaping services page.
Local Expertise: St. Clair Landscaping and Irrigation’s Material Selection and Pro Tips

The right materials can elevate your garden path, making it both functional and beautiful. At St. Clair Landscaping and Irrigation, we pride ourselves on selecting top-quality stones and sand that enhance your home’s exterior.
Our experts have years of experience in walkway installation. We ensure every project is completed with precision and care. This expertise saves you valuable time by managing the entire installation process.
When considering costs, a DIY paver walkway project can take around three days and may cost just under $1,000 for supplies and tool rentals. However, our professional service can provide a seamless experience, ensuring your project is completed efficiently.
If you’re looking to enhance your home, we offer professional advice on integrating pavers and gravel for a stunning look. Contact St. Clair Landscaping and Irrigation today to book your consultation and let our team handle the heavy lifting for your next project.
Conclusion
Building a beautiful paver path can enhance your home’s exterior and create a functional space in your garden. By following the professional steps outlined, you ensure that your pavers are set on a solid base with proper sand and gravel layers.
Remember, careful planning and the right materials are essential for a successful project that will last for many years. If you seek expert assistance, St. Clair Landscaping and Irrigation is ready to help you achieve the perfect look for your outdoor space.
Contact our team today to book your installation and let us transform your property with our professional landscaping services and expert craftsmanship.