How much value can a smart plan add to your yard — and could a focused upgrade really pay for itself? The guide, how to design outdoor living spaces, starts with outdoor living spaces as a practical, step-by-step list. It shows how to plan from foundations to final touches and sets real budget expectations.
Know this up front: full backyard projects can run up to $65,000, fixed features like pergolas or fireplaces often return up to 80%, and major investments such as pools or kitchens may deliver much higher ROI in warm climates.
This article treats your exterior like interior design: prioritize function, then layout, comfort, and style. You will learn zoning, foundations (patio, deck, pavers), shade structures, furniture, lighting, kitchens, privacy, water and fire elements, landscaping, and durable materials.
The guide is for U.S. homeowners improving a patio, porch, deck, or yard, plus renters adapting balconies and anyone seeking backyard ideas that feel intentional. The organizing principle is simple: pick a main spot, then add supporting areas for everyday use and entertaining.
Key Takeaways
- Expect big budget ranges — full renovations can reach $65,000; pick scope to match value goals.
- Fixed features often boost resale; pools and kitchens give higher ROI in warmer regions.
- Plan function first, then layout, comfort, and finishing details.
- Core building blocks include zoning, foundations, shade, furniture, lighting, and durable materials.
- Design around a main gathering spot and add supporting zones for daily use and guests.
Plan your outdoor space around how you actually live outside
The best yards reflect routines—pick the few activities that matter most. Start by listing one to three regular uses: weekday dinners, morning coffee, kids’ play, poolside lounging, or hosting friends. Rank them so design choices support real habits instead of trends.
Map how people move from the house to the patio, yard, and garden. Note worn paths and door swings. A clear path prevents trampled grass and awkward bottlenecks. Keep grilling and serving close to the dining spot for easy flow.
Choose a main spot nearest the home—dining or lounging works for most families. Then add supporting areas farther out: a fire pit corner, a quiet reading nook, or a kids’ play zone. Place quiet areas away from doors and noisy routes.
| Main Spot | Best For | Supporting Area | Layout Tip |
|---|---|---|---|
| Dining | Family meals, entertaining | Grill & prep zone nearby | Keep serving within 10 feet |
| Lounging | Casual relaxing, reading | Fire pit or hammock corner | Place seating to face view or garden |
| Poolside | Sunbathing, socializing | Shaded seating and towel storage | Clear walkways for kids and pets |
Create zones that make outdoor living spaces feel like real rooms
Use subtle shifts—steps, flooring, and furniture—to turn an open yard into distinct areas. Zoning signals a room for eating, a room for socializing, and a quiet room for rest. Small changes guide movement without full walls.
Use multilevel layouts to separate dining, entertaining, and relaxing
Raise a deck or add a single step to mark the dining area. Different decking or pavers define the entertaining zone. Levels keep sightlines open while creating clear function.
Carve out a conversation area around a fire pit
Place chairs in a U-shape or circle around a stone fire pit so everyone faces inward. Leave clear paths and at least 3 feet behind each seat so chairs can pull out without hitting railings or walls.
Add a quiet corner with a hammock or swing chair
Combine an oversized swing or hammock, a small side table, and layered pillows and throw pillows. Put this reading nook where foot traffic is low for true comfort.
Design a small sunken area for intimacy
Lower a compact patio and add a fountain to introduce sound and enclosure. A sunken spot becomes a destination in a large backyard and helps furniture feel intentional.
| Zone Type | How to Define It | Anchor Element | Quick Tip |
|---|---|---|---|
| Dining | Raised deck or stone pavers | Table and pendant or pergola | Keep grill within 10 feet |
| Conversation | Level change or circular seating | Stone fire pit | Arrange chairs in U-shape |
| Quiet Nook | Secluded corner or hammock | Oversized swing | Use layered pillows for comfort |
| Sunken Spot | Lowered patio with edging | Small fountain | Provide 18–24″ step access |
Start with the right foundation: patio, deck, porch, or pavers

A solid base—patio, deck, porch, or pavers—sets the tone for every zone and every use. The foundation drives furniture placement, sightlines, and drainage. Pick a method that matches your yard and climate.
Flagstone and natural stone for rustic, organic character
Flagstone and natural stone add irregular shapes and texture that blend with planting beds. They pair well with flower borders and stone veneer on the house.
Mixed materials to define areas and modernize a large patio
Use two surfaces to mark purpose: one under the dining set, another under lounge seating. Coordinating brick with larger stone tiles breaks a large patio into clear areas without walls.
Deck tiles and simple pathways for budget-friendly function
Deck tiles, gravel strips, and stepping paths create routes from the porch to the yard and cut mud tracking. These quick upgrades boost curb appeal without a full renovation.
Consider slip resistance, heat retention, and freeze‑thaw durability when choosing materials. Match or complement existing exterior finishes so the space looks intentional, not tacked on.
| Foundation Type | Best Use | Cost Level | Maintenance Notes |
|---|---|---|---|
| Flagstone / Natural stone | Rustic patios, walks | Medium–High | Durable; check freeze‑thaw; can require resealing |
| Mixed materials (brick + stone) | Large patios with zones | Medium | Defines areas visually; coordinate colors with facade |
| Deck tiles & pathways | Budget upgrades, balconies, quick fixes | Low–Medium | Easy DIY; replaceable; watch for sun fade |
| Pavers / Porch | Structured dining and entry zones | Medium | Good drainage; simple repairs by replacing units |
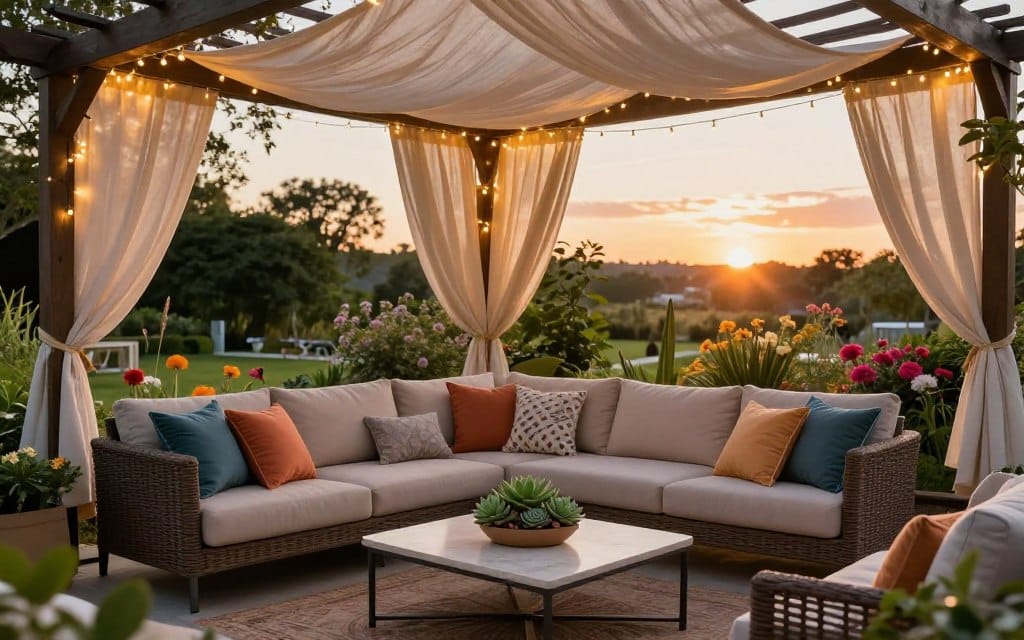
Build shade and overhead structure for comfort in summer
An overhead structure is the fastest way to give a patio a true sense of shelter and purpose. A defined ceiling improves comfort in summer, anchors a dining area visually, and makes the space feel finished without major construction.
Define the dining area with a pergola
Place a pergola directly over the table so the spot reads like a room. Add wired lights under beams for evening use and hang a pendant or two to create a focal point. Use durable materials that match your home’s trim so the structure feels built-in, not bolted on.
Try a louvered roof patio cover
Adjustable slats control sun and airflow all day. Many systems are remote-controlled and can link to home automation for timed shading. This option gives precise control of light and rain without sacrificing sightlines.
Use drapes or solar screens to soften light
Performance fabrics like Sunbrella panels cut glare while allowing breeze. Solar screens add privacy without closing the area off. These soft-shade solutions add texture and dimension on a modest budget.
Consider a pavilion or solid roof for rain protection
A solid roof lets you use upholstered seating and rugs without worry. It also expands usable days beyond summer and provides a base for recessed lights or ceiling fans.
| Solution | Best For | Key Benefit | Integration Tip |
|---|---|---|---|
| Pergola | Dining area | Defines a room, adds partial shade | Match post finish to home trim |
| Louvered roof | All-day sun control | Adjustable light; automation ready | Route power for motors and lights |
| Solar screens / drapes | Glare reduction and privacy | Softens light; maintains airflow | Use performance fabrics like Sunbrella |
| Pavilion / solid roof | Rain-ready seating | Weather protection; supports lights | Coordinate roofline with home walls |
Choose outdoor furniture that makes people want to stay
Pick furniture that invites you to linger; the right mix turns a yard into a go-to hangout. Start by planning seating for different moods—dining, lounging, and quiet reading—so guests can pick comfort that fits the moment.
Offer multiple seating types
Mix dining chairs, lounge chairs, benches, and a hanging chair or swing. Each piece meets a need: meals, conversation, or a solo nook for reading.
Use portable seating to stay flexible
Lightweight benches and folding chairs let a party migrate from the patio to the yard without dragging heavy pieces. Tuck benches under a table or stack them when not in use.
Layer comfort and keep sightlines open
Add water‑resistant cushions, outdoor pillows, and a few throw pillows for extra comfort. In scenic settings, choose low‑slung sofas so the view remains the star.
Layout basics and a quick style tip
Keep clear paths behind chairs and away from doors or the grill. Swap pillow covers seasonally to refresh the look without new furniture purchases.
| Seating | Best Use | Quick Tip |
|---|---|---|
| Dining chairs | Meals and gatherings | Keep within 10 feet of prep area |
| Lounge chairs & sofas | Relaxing and views | Choose low profiles for sightlines |
| Benches & swings | Flexible seating and nooks | Portable options extend the party |
Design lighting that extends your patio hours into the evening

A simple, layered plan for lights can double the hours you enjoy your yard. Start with three tiers: task lighting for dining, ambient lighting for lounging, and low-level path lights for safety. This approach keeps each area useful and welcoming after dark.
Hang pendants above the table
Woven or woven-look pendants make a playful focal point and provide useful task light directly over the table. Aim fixtures to shine downward so plates are lit and glare stays out of guests’ eyes. Choose damp-rated pendants for exposed locations.
Use solar-powered fixtures for efficiency
Modern solar pendants and lanterns can glow up to eight hours on a charge. They cut wiring work and reduce energy costs, making them ideal for long summer evenings and low-maintenance setups.
String lights under pergola beams for ambiance
Wrap string lights along beams for soft, even glow that warms a pergola or covered area. Pick warm white bulbs (2700–3000K) for a cozy feel rather than harsh white. Keep strands taut and out of reach of foot traffic.
| Fixture | Best Use | Key Benefit | Maintenance Tip |
|---|---|---|---|
| Pendants | Dining table | Task light + focal point | Use damp-rated fixtures; replace bulbs yearly |
| Solar lanterns | Casual seating & patios | Up to 8 hours; no wiring | Clean panels seasonally for full charge |
| String lights | Pergola & beams | Soft ambient glow | Prefer warm white; inspect wiring after storms |
Placement tips: keep walkways clearly lit from house to patio, aim task lights downward, and avoid fixtures that shine into seated sightlines. Choose fixtures rated for the elements and plan for easy bulb replacement and seasonal care.
Add an outdoor kitchen and bar area for effortless entertaining
Designing a prep-and-serve corner near your table makes hosting feel effortless. A compact cookline keeps traffic low and lets the host stay social while cooking. This works best for frequent hosts, families who grill several times a week, or anyone who wants to cut indoor mess during gatherings.
Use a privacy wall as a backsplash
Build a wooden privacy wall behind the grill so the kitchen reads like a real room. The wall doubles as a backsplash and a visual anchor. It also blocks sightlines and gives a sense of finish to the bar area.
Pick weather-ready materials
Choose durable quartz counters and nautical-grade metal cabinetry for U.S. climates. Use corrosion-resistant hardware and marine-grade finishes for long life. These materials reduce maintenance and keep the space looking sharp.
Plan workflow, shade, and storage
Keep prep close to the dining table so hot trays travel short distances. Place the cookline under a pergola, pavilion, or patio roof to give shade and a cooler work spot. Add storage for tools and a dedicated landing zone for drinks to keep the bar area organized.
| When It Makes Sense | Finish Tip | Recommended Materials | Workflow Tip |
|---|---|---|---|
| Frequent hosts & families who grill | Privacy wall as backsplash | Quartz counters, marine-grade cabinets | Prep zone within 10 feet of table |
| Poolside or backyard parties | Match wall to home trim | Corrosion-resistant hardware | Covered bar for shade and service |
Increase privacy without closing in your outdoor areas
Good privacy is layered: combine built elements with green buffers to make quieter, more pleasant areas without feeling boxed in. Start with a simple screen and then soften it with plants so the boundary reads as part of the yard, not a fence line.
Layered privacy works best when you mix:
Layer solutions with fencing, lattice, trellis, and wood walls
Use a wood wall or slat screen where you need full seclusion. Add lattice or trellis above or beside it to introduce pattern and light. A stained wood wall can double as a backsplash behind a grill or bar, giving function and style at once.
Use fast-growing trees and lush plants to soften hard edges
Plant fast-growing trees and dense shrubs to extend screening beyond structures. Green buffers make boundaries feel like garden features and cut noise. Focus taller plantings behind seating and keep lower plants near walkways so sightlines stay open.
Create separation with a gated arbor that still keeps views open
A short gated arbor or curved-top gate marks transitions—front yard to patio, driveway to garden—while preserving sightlines. Place eye-level screens near places you sit, and leave upper views open to avoid a boxed-in feeling.
| Solution | Best Use | Design Tip |
|---|---|---|
| Wood slat wall | Full seclusion near seating | Match stain to home trim; use as backsplash |
| Lattice / trellis | Porches, small patios | Paint for cottage style; keeps air flow |
| Fast-growing trees | Extend vertical privacy | Plant 8–12 feet back from structures |
| Gated arbor | Define transitions | Keep gate under eye level to maintain views |
Make fire features the anchor for three-season outdoor living

A single hearth can redefine a gathering area, giving structure and a natural focal point for friends and family. Fire features make a patio usable beyond summer and bring warmth and comfort to cool evenings.
Choose an outdoor fireplace as a focal point and support wall
An outdoor fireplace reads like a built-in wall. It anchors beams and can act as a support wall for overhead structures, creating a ceiling effect that defines the area.
Use a stone fire pit to define a cozy conversation spot
Stone is a classic choice that visually grounds the feature and pairs well with pavers or retaining walls. Arrange chairs in a circle or semicircle at a safe distance so the space reads as a defined area.
Add a heating element under a pergola to extend the season
Hanging a heater beneath a pergola boosts comfort without major construction. It tucks into existing structure and stretches usable nights into the shoulder seasons.
Safety note: plan clearances, orient features away from prevailing wind, and keep circulation routes behind seating so people can move without squeezing past the fire.
| Feature | Key Benefit | Placement Tip |
|---|---|---|
| Outdoor fireplace | Strong architectural focal point | Use as a support wall for beams; place near main seating |
| Stone fire pit | Durable, classic anchor for conversation | Circle seating 3–4 ft from rim; match nearby stonework |
| Pergola heating | Extends season without rebuilding | Mount heaters high, aim for even coverage; keep clearances |
Bring in water for a calmer, more sensory backyard
Moving water softens neighborhood noise and instantly changes how a yard feels. A small fountain or spill of water creates a steady, gentle sound that makes a backyard feel like a retreat.
Install a fountain to add relaxing sound in a small outdoor space
For tight patios and compact nooks, choose a single-stream fountain or wall-mounted spillway. One focused water line uses very little floor area while giving a clear focal point.
Place the fountain so it is visible from primary seating. That way the motion and sound are enjoyed while dining or lounging.
Coordinate water features with nearby pool areas for a cohesive feel
In larger yards, align fountains, spillways, or decorative bowls near the pool edge so materials and heights match. Repeat stone, tile, or metal finishes between features to avoid a scattered look.
Use matching water tones and spill designs to tie the pool and fountain into a single area that reads as intentional outdoor living.
Maintenance and winter care matter: choose locations that allow easy access for cleaning and pump service. In cold climates, plan for winterizing or removable pumps so features last longer.
| Feature | Best Use | Design Tip |
|---|---|---|
| Small fountain | Patios, sunken nooks | Wall-mounted or pedestal to save floor space |
| Spillway / cascade | Pool edges and terraces | Match stone and flow rate to pool finish |
| Decorative bowl | Garden corners and seating areas | Place within sightlines from main seating; easy access for maintenance |
When you plan, match materials—stone, tile, or metal—with adjacent hardscaping. Correct material choices make any water element look integrated, not tacked on.
Use plants, landscaping, and garden edges to soften hardscaping
Planting soft edges around hard surfaces makes a patio feel intentional and complete. Well-chosen greenery links stone, wood, and furniture to the backyard so built areas feel like part of the landscape.
Frame patios with flowering plants for seasonal color; use planters when beds aren’t possible. Decorative planters add summer pops and give instant curb appeal.
On a porch or balcony, choose containers filled with native plants for privacy and low maintenance. Repeat two or three varieties for cohesion, then add one seasonal accent for inspiration.
Try a simple grass ring around a lounge area to define a circle without extra pavers. This low‑maintenance border keeps sightlines open and guides movement subtly.
| Approach | Best Use | Maintenance | Benefit |
|---|---|---|---|
| Flowering beds | Patio edges | Seasonal pruning | Long-term color & texture |
| Decorative planters | Porch & balcony | Water weekly; native picks lower care | Instant privacy; portable |
| Grass ring border | Lounge circles | Mow with lawn | Defines area without more hardscape |
| Repeated palette | Whole garden | Low if varieties chosen well | Cohesion + seasonal highlights |
Choose materials and style details that hold up in US climates

Start material decisions with climate: sun, salt air, humidity, and freeze‑thaw dictate long‑term performance. Picking the right materials saves time on repairs and keeps the space looking intentional.
Prioritize wear‑well surfaces
For hot sun or coastal salt, favor plaster and natural stone; both resist fading and weathering better than softer finishes. Stone holds texture and color, so patios and walls stay timeless even with heavy use.
Warm hardscapes with rugs
Use fade‑ and mildew‑resistant rugs to add pattern and comfort. A single rug under seating defines a spot and is easy to clean or roll up for winter storage.
Refresh furniture on a budget
Spray paint restores rusted metal frames quickly. Choose one accent color for cushions and accessories so indoor and outdoor furniture read as a cohesive set.
| Climate | Best Materials | Maintenance Tip |
|---|---|---|
| Coastal / salt air | Plaster, natural stone, marine‑grade metal | Rinse yearly; seal stone where needed |
| Hot sun / UV | Light stone, sealed plaster, UV‑rated rugs | Pick light tones; store rugs in peak summer months |
| Freeze‑thaw regions | Pavers, frost‑rated stone, removable rugs | Choose materials that allow drainage; winterize furniture |
Repeat a few finishes—metal tone, wood stain, or stone color—so the whole outdoor living area feels designed, not collected. Pick materials you can realistically clean and store after storms or cold months.
Design for ROI and home value without overbuilding
Smart upgrades balance daily enjoyment with market appeal so your project doesn’t outpace the neighborhood. Use ROI as a simple filter: will the change be used often and appeal to buyers?
Fixed features such as fireplaces, fences, pergolas, and water elements commonly return up to 80% of cost. These additions define a patio or backyard and show as built value rather than optional decor.
Major investments—pools, jacuzzis, and a full outdoor kitchen—can perform very well in warm climates. In the right market, some owners see returns approaching 200%, especially where pools and an outdoor kitchen are expected amenities.
Right-size projects to lot size and local comps. Durable materials and a cohesive design photograph better and reassure buyers. If an idea won’t be used weekly in your prime season, choose a scaled version or phase it later.
| Upgrade | Typical ROI | Best For | Quick Decision Tip |
|---|---|---|---|
| Fireplace / Fire pit | Up to 80% | Defines seating; three-season use | Choose stone for longevity and resale |
| Pergola / Gazebo | Up to 80% | Shade and defined dining area | Match trim and materials to the home |
| Water feature | Up to 80% | Calm sound; focal point for small yards | Pick low-maintenance pumps and frost-proof parts |
| Pool / Outdoor kitchen | Up to 200% in warm markets | High-use, warm-climate homes | Only if neighborhood supports higher home values |
Keep it budget-smart and maintenance-ready over time
Small, smart investments often stretch a project farther than a big one-time overhaul. A full backyard renovation can reach $65,000, so plan phases that match your budget and timeline.
High-impact, low-cost upgrades
Focus on quick value: better lighting, fresh pillows, a patterned rug, and defined pathways. Deck tiles and crisp walkways make a patio read as intentional fast.
Protect and store furniture
Clean cushions, cover frames, and store soft goods in bins for winter. Proper care prevents mildew, rust, and sun fading and extends furniture life.
Screened porches for three-season comfort
Consider a screened porch if you want more usable months without full enclosure. It adds comfort and reduces weather worries while keeping yard views.
| Action | Cost | Benefit |
|---|---|---|
| Lighting upgrade | Low–Medium | Better nights and safety |
| Rugs & pillows | Low | Instant style refresh |
| Deck tiles & paths | Low–Medium | Defines zones; reduces mud |
| Screened porch | Medium–High | Three-season comfort |
Protect your investment: use covers, seasonal checks, and storage solutions to keep the space useful and reduce replacement costs over time.
Conclusion
Wrap up your project with simple moves that make the space more usable and valuable. Start with how you use the yard, set a solid foundation, and carve clear zones so every area has purpose.
Focus on comfort, flow, and durability across U.S. climates. High-leverage upgrades are an overhead structure for shade, layered seating for comfort, and lighting that extends patio hours into the evening.
Remember budget and value: a full backyard overhaul can reach $65,000. Fixed features often return up to 80%, and major upgrades like pools or an outdoor kitchen may reach as high as 200% ROI in warm markets.
Weekend action: pick a main spot, add one supporting zone (fire pit or quiet corner), then add one comfort item and one light. Use these ideas as a short checklist so your outdoor living spaces feel cohesive, functional, and enjoyable for years.