Are you planning a patio and want it to function as two distinct areas — a bustling outdoor kitchen for cooking and a relaxed lounge for unwinding — without overspending? Thoughtful zoning of your paver patios makes the difference between a pretty surface and a practical, long-lasting outdoor living space.
Rushing into layout or material choices can create costly problems later: cramped circulation, poor drainage, or surfaces that don’t stand up to foot traffic and patio furniture. With a clear zoning strategy you protect your investment, improve daily use, and create a backyard that looks great and works for your family and guests.
Smart planning also means choosing contractors who stand behind their work with reliable warranties and can show a zoning plan that addresses materials, drainage, and lighting. Keep the zoning tips below in mind as you read each section to design a cooking and lounging layout that lasts.
What you’ll learn
- How to divide your patio into cooking and lounging zones for safety and flow.
- Which pavers and materials perform best for each area and how they affect the look and maintenance of your space.
- Practical tips to avoid common layout mistakes so your new patio adds value to your home.
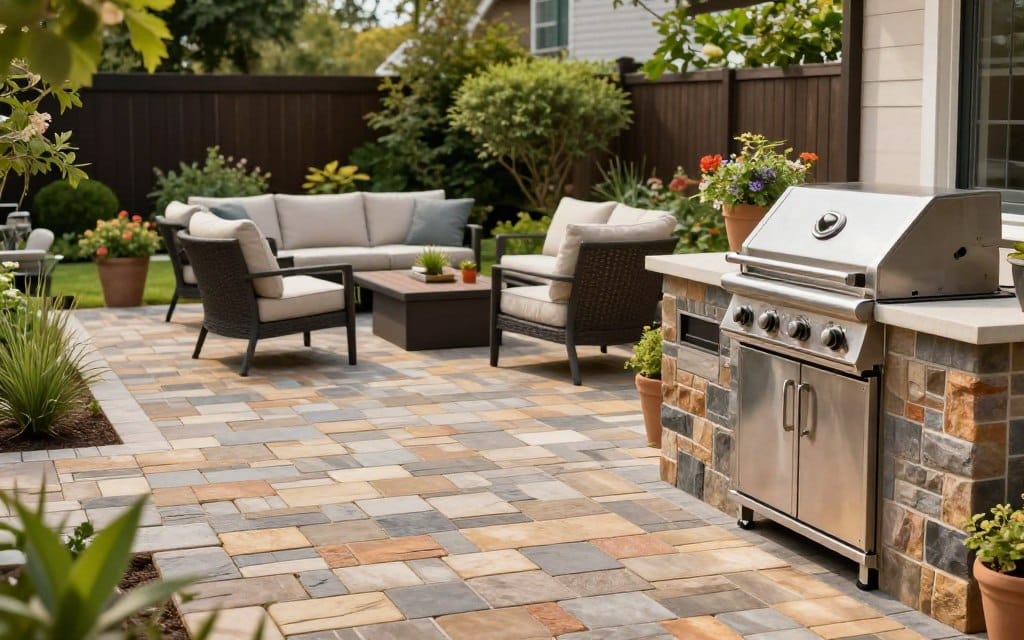
Why Zone Your Paver Patio?
Zoning your patio into clear cooking and lounging areas turns an attractive outdoor surface into a practical extension of your home. Thoughtful zoning improves circulation, keeps cooking heat and smoke away from relaxed seating, and makes maintenance easier — so your patio performs well for daily life and for entertaining.
What Does Zoning Entail?
Zoning combines softscape (plants, trees, shrubs) with hardscape elements and durable hardscaping services to create purpose-driven areas. For example: position an outdoor kitchen or grill near service routes and prep space; place dining close to the grill but with enough clearance for guests; locate a lounge or fire pit in a quieter, wind-sheltered corner. Using defined paver patterns or slight level changes can visually separate zones while keeping the overall patio cohesive.
Good zoning also considers material choices and how they perform under different loads. Use sturdier pavers and compacted bases in high-traffic cooking and prep areas, and softer textures or larger-format paver patterns in lounging zones to enhance the look and comfort of your patio furniture.
Benefits of Zoning and Professional Design
Hiring a professional helps you balance aesthetics and functionality so each area fits your lifestyle and site conditions. Designers integrate critical details like drainage, lighting, and access to utilities while preventing common layout mistakes that reduce usability. A well-zoned paver patio can increase your usable outdoor area and contribute to your property’s appeal.
- Zoning benefits: better circulation, improved safety, simplified maintenance, and enhanced entertaining flow.
- Design considerations: material selection, access to power and water for cooking zones, seating clearances, and lighting for evening use.
- Cross-check later sections for specifics on materials, drainage solutions, and lighting to finalize a practical zoning plan.
Common Misconceptions About Landscaping

Good patio design looks simple — but that simplicity is the result of careful planning. Many homeowners assume landscaping (and a paver patio) is a quick DIY weekend project, but that can lead to costly mistakes: poor drainage, cramped layouts that block flow, and material choices that don’t suit each zone. Separating myth from best practice helps you build a backyard that both looks great and functions well.
DIY vs. Professional Help
It’s a common belief that hiring a pro is an unnecessary expense. In reality, many design professionals stress the importance of seamless indoor-outdoor transitions and thoughtful zoning. Professionals bring site analysis, access to higher-grade materials, and experience solving tricky issues like runoff and sub-base preparation — all of which lengthen the life of your patio and reduce long-term costs.
For example, a DIY approach might place a grill too close to seating or under a tree — creating smoke and safety problems — while a planned, professional layout intentionally sites the outdoor kitchen near utility access and service routes. That planning prevents fumey dinners and makes entertaining more comfortable.
| FeatureDIY ApproachProfessional Help | ||
| Planning | Sketches and quick fixes | Site analysis, zoning plan |
| Cost | Lower up front, higher risk later | Higher up front, better long-term value |
| Longevity | Short-term results | Durable, well-detailed installation |
Seasonal Changes and Plant Choices
Another frequent misconception is that plants chosen for looks will thrive everywhere. Without considering microclimates, sun/shade patterns, and soil, many plants fail within a year. For zoned patios, pick plantings that support each area: low-maintenance, fire-resistant species near a fire pit; fragrant, low-shedding plants near lounge areas; and herbs or utilitarian plants near cooking zones.
Using coordinated paver patterns and planting beds can visually link zones while accounting for seasonal change. Before you buy, map sun angles and prevailing winds, and choose plant and paver combinations that keep cooking fumes away from seating and avoid leaf litter where you want low maintenance.
Want a quick zoning sanity check? Download or create a one-page checklist that lists distances between grill and seating, recommended plant types per zone, and drainage items — refer to this checklist while reviewing materials and contractor bids.
Mistake
One of the most common—and most costly—errors in hardscape work is skimping on the base beneath the surface pavers. Homeowners often focus on the finished look of the stone or concrete pavers and overlook the compacted sub-base and bedding layer that keep everything level and durable. Skipping these steps leads to sinking, shifting, and frequent repairs.
When long-term stability is ignored, your paver patios can settle unevenly, creating tripping hazards and ruining the clean look of your backyard. Repairing a failed base is typically far more expensive than installing the correct base from the start.
Proper installation generally includes: removing topsoil, testing subgrade conditions, installing a geotextile where needed, and building a compacted gravel sub-base followed by a bedding sand layer. Compact the base in 2–3 inch lifts with a machine compactor for consistent density. These steps create a level, stable surface that supports furniture, foot traffic, and the occasional heavy load.
| FeatureProper ConstructionPoor Construction | ||
| Base Depth | 6–8 inches gravel (may vary by soil and load) | Less than 3 inches |
| Compaction | Machine compacted in lifts | Loose or hand‑tamped |
| Surface Result | Level and stable | Sinking and shifting |
| Maintenance | Minimal upkeep | Frequent, costly repairs |
Note that base depth and specifications may vary depending on soil type and expected loads (driveways require deeper bases than lounge patios). For cooking zones or areas that will hold heavy grills, ask your installer for a written sub-base plan and proof of compaction testing. A simple cost comparison often convinces homeowners: the one-time investment in correct materials and compaction is usually much less than repeated repair costs on a failed base.
1: Ignoring Soil Quality

Skipping a soil check is a fast way to undermine both planting beds and the integrity of your paver patios. Good soil supports healthy plants and stable paver bases; compacted or poorly draining ground leads to weak roots, standing water, and even damage to nearby hardscape. When you plan separate cooking and lounging zones, treat the substrate for each area according to its needs: structural stability for the cooking/prep area, and amended topsoil for planting beds that border the lounge.
Before any hardscape work begins, test the site: take several soil samples from planned zones and send them to a lab or use a reliable extension service. Look for compaction, drainage issues, and pH/nutrient levels. If the subgrade is dense or poorly draining, you may need to remove topsoil, add gravel or a geotextile layer under the paver base, and improve drainage with a perforated pipe or amended aggregate. For planting areas, add organic matter and adjust pH as recommended.
Quick How‑To Checklist
- Collect 3–5 soil samples across the work area and get a lab test (or consult your local extension).
- Test for compaction and infiltration rate — do a percolation test if drainage seems slow.
- For paver areas: remove organic topsoil, install a compacted gravel base (see base depth guidance), and separate planting soil from the base with edging or geotextile.
- For garden beds: amend with compost or topsoil to recommended depths; select plants suited to the local conditions.
- Document recommendations and include them in contractor specs so the base and planting soils are handled correctly.
Why this matters for zoning
Different patio zones demand different ground treatments: cooking zones need rock-solid bases to support grills and prep surfaces; lounging zones benefit from stable but comfortable paver patterns under patio furniture. Poor soil prep may “may vary” in its effects by region and can lead to uneven settling where you least want it. Addressing soil quality up front protects both your planting and your pavers—and saves money on repairs later.
Mistake
Overlooking water management is one of the fastest ways to ruin a well-planned patio. When runoff isn’t controlled, water pools on pavers, erodes the edges, and can lead to uneven settling—problems that are expensive to fix and that undermine both cooking and lounging zones.
Good drainage starts with grading: direct surface water away from the house and high-use areas so runoff doesn’t flow through your lounge seating or toward doors. Professional installations often combine subtle slopes with targeted solutions like channel drains at the grill island, French drains behind retaining walls, or a permeable base under select pavers to handle heavy flows.
Remember that the right drainage approach depends on site conditions. Where soil drains slowly, a permeable pavers patio with an engineered gravel base can reduce puddling. In tighter sites, a combination of a 1–2% outward grade (standard practice in many areas) plus hidden drainage outlets is a reliable solution.
| Drainage FeaturePoor ManagementProfessional Solution | ||
| Surface Slope | Flat or inward pitch | 1–2% outward grade (may vary by code/site) |
| Water Runoff | Pooling near patio or foundation | Channel drains, French drains, directed outlets |
| Soil Stability | Erosion and shifting | Compacted sub-base with gravel |
| Longevity | Cracking and sinking | Permeable base or engineered drainage systems |
Practical zoning tips: place the grill and prep area so channel drains can be installed nearby, slope dining zones slightly toward a planted swale or outlet, and locate the lounge area upwind of the cooking zone where possible. Before signing a contract, ask your installer to show the proposed drainage plan for each area and how the pavers, gravel base, and pattern will work together to keep surfaces level and dry.
2: Choosing the Right Plants and Surfaces for Each Zone

Picking the right plants and the right pavers is key when zoning your patio: the vegetation should support the purpose of each area, and the surface must stand up to the specific wear and conditions of cooking or lounging zones. Poor plant or material choices result in high maintenance, fading, staining, or even safety issues around a grill or fire pit.
Below we break this into two practical subsections—planting for lounge zones and surface choices for cooking zones—so you can make targeted decisions for each area of your patio.
Planting for Lounge Zones
For the lounge area, prioritize low-maintenance, low-litter, and fire-resistant plantings that create comfort and privacy without constant upkeep. Examples include native ornamental grasses, broadleaf evergreens for year-round screening, and compact shrubs that won’t drop large amounts of debris onto patio furniture.
- Choose plants with non-invasive root systems near paver edges to avoid lifting pieces.
- Prefer fragrant, low-shedding species where guests will sit—avoid high-sap or pollen-heavy trees directly over seating.
- Near a fire pit, select fire-resistant species and keep clearances per local code to reduce backyard fire risk.
Surface Choices for Cooking Zones
Cooking and prep areas face heat, spills, and higher foot traffic, so surface selection matters: durable pavers, concrete pavers, or certain natural stone choices perform best. Look for low-porosity options to resist staining and easy-clean finishes for grease-prone zones. For the grill island, choose a solid, level paver pattern—herringbone or basketweave patterns lock together under lateral load and hold up well under repeated use.
| Material TypeBest UseNotes | ||
| Concrete Pavers | Cooking & high-traffic areas | Durable, available in many colors; low porosity options exist |
| Natural Stone | Premium lounge or mixed zones | High-end look; choose low-porosity varieties (may vary by stone) |
| Custom Pavers | Both zones (depending on spec) | Engineered for durability and consistent color/pattern |
Color, Pattern, and Comfort
Color choice affects heat: lighter tones (including some gray natural stone or gray natural pavers) stay cooler underfoot than dark concrete. Pattern affects both look and performance—tight interlock patterns improve level and stability under furniture legs. Consider how the pattern and color will look with patio furniture and the surrounding garden to achieve a cohesive style.
Quick Selection Checklist
- For lounge zones: prioritize comfort, low litter, and fire-safe plants; select pavers that complement patio furniture and reduce glare.
- For cooking zones: choose low-porosity, stain-resistant pavers or concrete pavers; prefer interlocking patterns for stability.
- Confirm with suppliers about maintenance requirements and warranty for your chosen paver or stone.
When in doubt, request samples of pavers in place during different times of day to see color and heat performance, and consult plant guides for native or drought-tolerant species that suit your backyard microclimate.
3: Improper Drainage Solutions

Water is the silent enemy of outdoor hardscapes: left unmanaged it pools on pavers, erodes bases, and creates hydrostatic pressure that leads to cracking, sinking, and lateral movement. For a well-zoned patio, drainage isn’t an afterthought — it’s a core design requirement that protects both cooking and lounging areas.
Start with professional grading so surface runoff moves away from the house and away from lounge seating and doorways. Where water concentrates — for example, at the edge of a cooking zone or behind a retaining wall — add engineered solutions like channel drains at the grill island, French drains behind seating terraces, or a directed outlet to a storm sewer or dry well. In some zones, permeable pavers installed over an engineered gravel base will allow infiltration and reduce surface pooling.
Key Takeaways
- Improper drainage is a leading cause of long-term failure in patios — plan it during design, not after installation.
- Grade surfaces away from structures and living areas; 1–2% outward slope is common practice but may vary by site and code.
- Use targeted drains (channel drains, French drains) where runoff collects; consider permeable pavers where appropriate.
- Compacted gravel bases help with soil stability and drainage under both concrete pavers and natural stone.
- Edge restraints and proper base materials keep pavers locked in place and protect the drainage system.
Mistake
Even with quality pavers and a good base, failing to secure the perimeter invites problems. Edge restraints prevent lateral migration of paver pieces caused by traffic, freeze-thaw cycles, and erosion. Without a solid edge — concrete curbs, metal or plastic restraint systems, or full mortar-set edging where appropriate — patterns loosen and the patio loses its crisp look and level.
Choose edge restraint type based on material and site conditions: rigid concrete curbs or poured concrete edging are excellent for heavy loads and vehicle areas; plastic or metal restraints work well for pedestrian patios where a neat finish and easier installation are priorities. Always pair your restraint with a compacted gravel base and a bedding sand layer to ensure the whole system drains and stays level.
Drainage & Edge Checklist for Zoning
- Show the proposed grade arrows on your plan — water should flow away from the house and main seating areas.
- Specify channel drains at the low side of cooking zones (grill islands, prep counters).
- Consider permeable pavers over an engineered base in areas with poor soil infiltration.
- Confirm edge restraint type for each zone (concrete curb / metal / plastic) and request installation details from your contractor.
- Ask for compaction test results or a compaction report for the gravel base and confirm the drainage outlet locations.
Before signing a contract, request a site-specific drainage plan showing how the chosen pavers, gravel base, pattern, and edge restraints will work together to keep each patio area level and dry. That plan protects your investment and ensures your cooking and lounging zones remain functional and attractive for years to come.
4: Maintenance, Growth Planning, Budget & Hiring
A great zone plan doesn’t end when the pavers are down — ongoing maintenance, allowances for plant growth, and a realistic budget all determine whether your cooking and lounging areas remain functional and attractive over time. Treat maintenance and growth planning as integral to your patio design so the space continues to serve your home for years.
Lawn & Plant Maintenance (Frame Your Patio)
The lawn and planting beds form the visual frame around your paver patio; neglect makes even high-end materials look tired. Regular mowing, seasonal fertilization, and aeration keep turf healthy and reduce weed pressure that can creep into joints. For planted zones, prune to preserve sightlines and prevent roots from lifting paver pieces.
- Schedule mowing and edging to keep grass from encroaching on paver joints.
- Mulch planting beds to reduce weeds and retain moisture — less maintenance for lounge and dining zones.
- Follow spacing guides and plan for mature plant size to avoid overcrowding and future removals.
Lighting & Evening Use
Lighting extends usable hours for both cooking and lounging. Low-voltage LED fixtures are energy efficient and work well with pavers, while solar accents are good for decorative highlights. Plan pathway and task lighting near the grill and dining zones, and softer ambient lighting around the lounge and fire pit to create layered illumination without glare.
| Lighting TypeEnergy EfficiencyBest Use Case | ||
| Low-Voltage LED | High | Pathways, task lights near grill and prep |
| Solar Powered | Very High | Accent lighting and decorative borders |
| Line Voltage | Low | Large area/security lights (professional install) |
Planning for Growth
Plants change size — fast. Avoid overcrowding by selecting species based on mature dimensions and grouping plants with similar growth rates. Keep larger trees well away from foundations and hardscape edges to prevent root damage. For fire features, leave clearances per local code and choose fire-resistant plantings nearby to reduce backyard fire risk.
- Use spacing guides and plant tags listing mature height and spread.
- Avoid planting large trees within root distance of patio edges or retaining walls.
- For fire pit areas, maintain an 8–10 foot clear zone (check local codes for exact distances).
Budgeting & Hidden Costs
Set a realistic budget early and plan for common hidden costs: permits, grading, delivery of heavy materials (stone, gravel), and utility hookups for gas or power at grill islands. Local labor and material costs vary, so get multiple bids and include a contingency fund of 10–15% for overruns. The price range for durable pavers commonly falls between about $10 and $25 per square foot, but that number may vary by region and product.
How to Create a Practical Budget
List must-have features and rank them. Example layout estimates to guide sizing and costs: a dining area for six typically needs about 10×12 feet; allow 6–8 feet for grill/prep clearance beside the cooking zone; design a lounge with an 8–10 foot radius around a fire pit for comfortable seating. Use these baselines when you compare bids.
Hiring the Right Contractor
Your contractor’s experience affects every element of the project — drainage, base compaction, edge restraint, and final appearance. Ask candidates for a zoning plan, references from similar projects, and proof of licensing and insurance. Confirm they provide material details (type of pavers, gravel base depth, edge restraint type) and a clear warranty on workmanship.
| Selection CriteriaWhat to Look ForWhy It Matters | ||
| Experience | 5+ years, portfolio of patio projects | Proven reliability and finished look |
| Drainage Plan | Grading and slope detail | Prevents water damage and sinking |
| Material Quality | High-grade stone/pavers & gravel | Longevity of the build |
| Licensing | Valid contractor license and insurance | Protects homeowner from liability |
Maintaining Your Investment
Routine care preserves the look and function of your patio: sweep or blow debris, clean spills promptly to avoid stains, and re-sand joints as needed. Follow manufacturer maintenance tips for your chosen paver or stone to extend life and appearance. Call a pro if you notice paver creep, major settling, or drainage failures that exceed DIY fixes.
Final Zoning Checklist (Quick)
- Confirm adjacency: grill → prep → dining (10×12 ft baseline for dining); lounge → fire pit with 8–10 ft seating radius.
- Specify base & gravel depth, edge restraints, and pattern for each zone in the contract.
- Request a drainage plan showing slopes, channel drains, and outlet locations.
- Plan lighting for safety and ambiance: task light at cooking zone, ambient light at lounge.
- Allocate 10–15% contingency in your budget and verify warranties for materials and workmanship.
Use this checklist when reviewing bids and plans so your pavers patio maintains its look and function for years to come. If you’d like, ask your contractor for a printable zoning plan based on these guidelines to bring to your design meeting.