Have you wondered why some yards feel inviting at night while others seem dark and unsafe? This guide explains what low voltage landscape lighting is (12V systems) and why many U.S. homeowners treat it as a DIY-friendly way to boost curb appeal and safety. It lays out planning steps, fixture and transformer choices, and the core installation steps that deliver reliable light for paths, patios, and entries.
Readers who want brighter curb appeal, better nighttime visibility, or practical lights for an outdoor space will find clear, practical advice. You’ll learn the difference between designing a system and installing it, and why following both steps in order yields the best results.
We also preview key performance factors you’ll evaluate: brightness, glare control, color temperature, durability, and options for future expansion. Plus, the guide covers safety and long-term tips like voltage drop, cable protection, and routine maintenance so your system works year after year.
Key Takeaways
- Understand what a 12V system is and why it’s DIY-friendly.
- Plan design before buying fixtures and a transformer.
- Compare kits versus custom builds for your home needs.
- Focus on brightness, glare control, and durability.
- Learn safety steps for reliable, season‑to‑season performance.
Why Low-Voltage Landscape Lighting Is Worth It for Your Outdoor Space
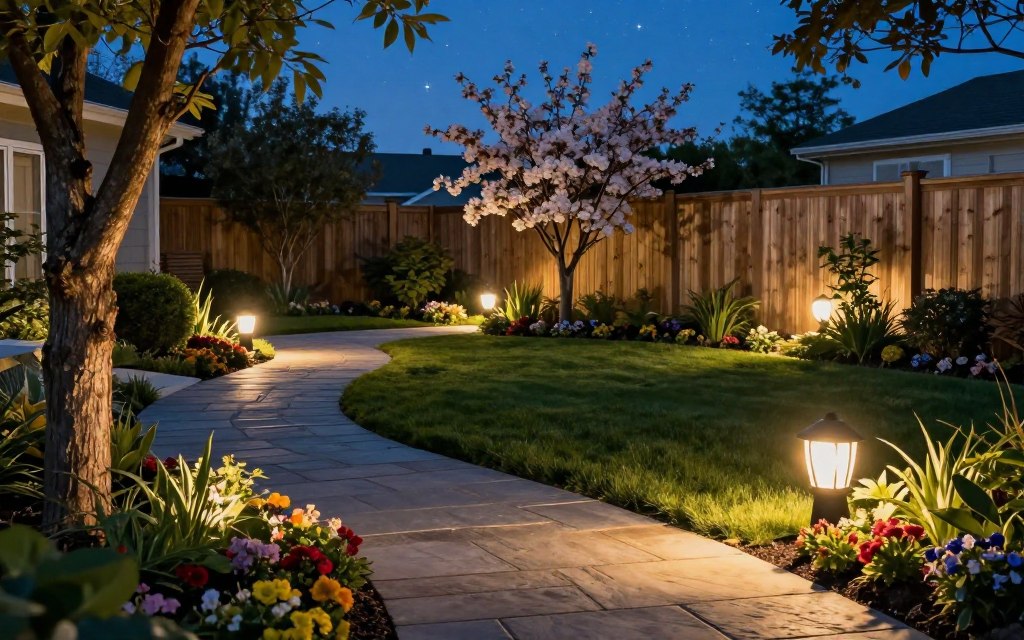
Smartly placed exterior lights give your property a new sense of depth and purpose at night. Investing in landscape lighting is about more than brightness—it’s about highlighting features, improving safety, and creating a mood for evening use.
Aesthetic impact with layered outdoor lighting
Layering uses ambient path light, targeted accent light, and task light to build depth. This approach highlights architecture, trees, and entry points without overdoing the glow.
Good layering changes the feel of an outdoor space. It creates focal points and a softer, more inviting yard after dark.
Safety benefits for paths, steps, patios, and entryways
Lights along steps, uneven paths, and deck edges reduce trips and make navigation easy for guests. Proper fixture choice and spacing matter more than adding many units.
Security value from illuminating dim areas around the home
Targeted light reduces dark pockets near gates, side yards, and drive edges. Visible, well-aimed illumination discourages unwanted activity while keeping the space usable.
| Benefit | Practical gain | Best application |
|---|---|---|
| Aesthetic | Highlights features and adds depth | Facades, trees, entryways |
| Safety | Improves night navigation | Steps, paths, patios |
| Security | Reduces dark pockets | Perimeter, gates, drive edges |
For many homeowners, a low voltage system is attractive because it’s efficient, scalable, and easier to install than line systems. The key to deciding if it’s worth it is matching fixtures and brightness to the space and the intended use—not simply adding more lights.
Planning Your Landscape Lighting Design Before You Buy

A quick evening walk reveals the spots that benefit most from thoughtful illumination.
Mapping priority zones
Sketch the yard and mark walkways, driveway edges, decks, and gathering areas. Note where darkness causes trips or hides features.
Label each spot by purpose: wayfinding, safety, or a focal point. This makes buying decisions practical and focused.
Choosing uplighting versus downlighting
Use accent uplighting for dramatic effects on trees and facades. It pulls the eye upward and creates striking focal points.
Choose subtle downlighting for seating areas and steps. Downlighting gives soft, natural coverage and cuts glare.
Color temperature, brightness, and layering
Pick warm white color for comfortable evenings and better contrast. Avoid overly bright fixtures that create hotspots or glare into windows.
Layer lights: path lights for navigation, accent lights for features, and hardscape fixtures for stairs and walls. A layered design adds depth and balance.
| Technique | Effect | Best application |
|---|---|---|
| Accent uplighting | Dramatic, upward emphasis | Trees, facades, statues |
| Downlighting | Soft, natural coverage | Decks, patios, seating |
| Path lights | Wayfinding and safety | Walkways, drive edges, garden paths |
Plan cable routes and transformer placement early so runs stay short and performance is reliable. This saves work during installation and improves long-term results.
Low Voltage Landscape Lighting: What a Complete System Includes
Getting consistent, safe light outdoors starts by understanding each component in a full system and how they connect.
The core parts are straightforward: a transformer, cable runs, fixtures, connectors, and controls. Each part has a role in delivering even, reliable illumination across the yard.
Transformer basics: stepping down household power to 12V
The transformer converts house line power to 12V so fixtures and led modules can run safely. Pick a transformer sized for the total wattage of all fixtures plus a 20% buffer for future additions.
Fixtures and bulbs/LED modules: what creates the light
Fixtures include path posts, spot heads, hardscape units, and deck pieces. Some use replaceable bulbs; many now use integrated led modules for efficiency and long life.
Low-voltage cable, connectors, and layout “runs”
Cable runs carry power from the transformer to each fixture. Longer runs and thin cable can cause voltage drop and dimmer output at the far end.
Waterproof connectors and secure splices prevent common failures. Plan routes to keep runs short and avoid accidental damage from digging or foot traffic.
Controls: timers, photocells, and smart options
Basic controls include a timer or photocell for dusk-to-dawn operation. Smart control transformers and smart control timers pair with apps like Kichler Connects for scheduling, grouping, voice commands, and remote adjustments.
| Component | Function | Buying tip |
|---|---|---|
| Transformer | Steps down to 12V; provides wattage capacity | Size for total watts + 20% buffer |
| Fixtures / Bulbs | Produce beam type and color temperature | Choose fixture type by application; prefer LED for efficiency |
| Cable & Connectors | Deliver power; protect against moisture | Use durable cable, waterproof fittings, and plan short runs |
| Controls | Automate schedules and scenes | Consider smart controls for app-based convenience |
Choosing Fixtures by Application and “Types” of Light

The right mix of fixtures defines safe routes and beautiful focal points in any outdoor area. Match each spot to a fixture family so you buy with purpose and avoid mismatched beams or glare.
Path and spread lighting for walkways and garden borders
Path fixtures guide movement. Spread fixtures offer wider, lower beams that wash beds and borders.
Use closer spacing with path posts for clear wayfinding. Choose spread heads when a softer, continuous glow is the goal.
Spot, flood, and accent lights for trees, facades, and focal points
Spot fixtures focus a narrow beam for trunks or columns. Flood fixtures cover larger surfaces like facades or hedges.
For accents, pick a tighter beam and aim carefully to avoid glare into windows or seating areas.
Deck and patio fixtures for steps, posts, and rails
Prioritize step visibility and glare control near seating. Pick fixtures that mount flush or under rail caps for subtle safety light.
Buying checklist: clear step illumination, shielded output at eye level, durable finish, and easy maintenance access.
Hardscape fixtures for walls, caps, and stonework
Grazing fixtures add depth by throwing light across texture. Use shallow-angle aim to emphasize stones and caps.
Water lights for ponds and moving features
Choose water-rated fixtures and position them to highlight movement without reflecting glare into pathways. Aim lights to show ripples and edges, not to blind onlookers.
| Category | Best Use | Beam | Buying Tip |
|---|---|---|---|
| Path & Spread | Walkways, borders | Wide/Even | Spacing controls balance |
| Spot/Accent | Trees, statues | Narrow/Focused | Shield to reduce glare |
| Deck & Patio | Steps, rails | Controlled/Soft | Check mounting and finish |
| Hardscape/Water | Walls, ponds | Grazing/Underwater | Use rated units and aim carefully |
Integrated LED vs Lamp-Ready Path Lights
Choosing between lamp-ready fixtures and integrated LED lighting modules affects maintenance, flexibility, and how your paths look over time.
Lamp-ready path lights: swap bulbs to change beam and color
Lamp-ready path light fixtures accept replaceable bulbs. You can change bulbs to alter color temperature, beam spread, or perceived brightness.
Troubleshooting tends to be simple: a failed unit often needs a new bulb rather than a full replacement. That makes upkeep familiar to many homeowners.
Integrated LED path lights: convenience, efficiency, and higher output
Integrated low voltage landscape LED lighting modules deliver strong output with better energy use than many bulb-based units. They offer set-and-forget convenience and long runtimes.
However, built-in modules lock you into the factory color and beam unless you swap the whole fixture.
| Feature | Lamp-Ready | Integrated LED |
|---|---|---|
| Customization | Swap bulbs for color and beam | Fixed beam and color |
| Maintenance | Simple bulb replacement | Replace module or fixture at end of life |
| Energy & Output | Depends on bulb choice | Typically higher efficiency and output |
How to decide
Pick bulb fixtures if you like tweaking color or experimenting with new bulbs. Choose integrated LED if you want efficient, low‑touch performance that lasts.
Selecting a Transformer and Controls That Match Your Needs

Choosing the right transformer and controls makes the difference between a dim, inconsistent system and steady, predictable outdoor lighting. Start by totaling the wattage of every fixture you plan to run. Add a 20% buffer so future additions won’t force an upgrade.
Sizing the transformer for total wattage and future expansion
Add up fixture wattages, including any integrated LED modules. Multiply by 1.2 for headroom. That ensures the transformer handles current load and future growth without overheating.
Remember that long cable runs lower the delivered voltage at far fixtures. A properly sized transformer and heavier-gauge cable keep brightness consistent across the run.
Smart control transformer and timer options for app-based control
Basic mechanical or digital timers give reliable on/off schedules. Photocells automate dusk-to-dawn operation without fuss.
Smart control transformers and smart timers work with apps like Kichler Connects for phone, tablet, or voice control. They set up quickly and let you group circuits, create scenes, and adjust remotely.
Scheduling and automation: dusk-to-dawn, scenes, and seasonal timing
Common automation: dusk-to-dawn for path lights, separate scene timing for accent fixtures, and seasonal offsets so schedules follow sunset changes. Choose controls that match how often you change settings—hands-off reliability or flexible schedules for entertaining and holidays.
| Option | Best for | Key benefit |
|---|---|---|
| Mechanical/Digital Timer | Simple systems | Reliable, low cost |
| Photocell | Path and safety lights | Dusk-to-dawn automation |
| Smart Transformer/Timer | Expandable systems | App control, scenes, remote setup |
Picking the right transformer and controls is a purchase decision that prevents underpowered systems and frustration after installation. Match capacity to needs and choose controls that fit your routine for better outdoor lighting results.
Buying Kits vs Building Your Own Lighting Line
Kits bundle what you need into one box, making the start of an outdoor project much simpler.
Typical sets include a transformer, several fixtures (often LED), cable, and basic connectors. Some kits omit heavier-gauge cable, extra splices, or specialty beams for uplighting. That gap is easy to fix but worth checking before you buy.
Why kits suit first-time installation and tight budgets
Kits reduce compatibility questions and speed up buying. A single purchase gets a predictable run of lights ready for a small path or entry.
They also stretch a tight budget: affordable fixtures plus a transformer deliver immediate curb appeal. Choose a kit with transformer headroom if you plan future additions.
When custom systems make sense
Custom lines win when you mix path fixtures with focused uplights and accent heads. They let you pick beam angles, finishes, and exact placement for layered effects.
Go custom if the site needs varied beams or premium materials that a box kit won’t include.
| Option | Best for | Key trade-off |
|---|---|---|
| Pre-bundled kit | Starters, tight budgets, quick installs | Convenience over fine-tuned beam or finish choices |
| Custom system | Complex yards, layered designs, high-end results | More planning and parts shopping required |
| Hybrid (kit + add-ons) | Expandable projects | Requires transformer capacity check and extra parts |
Decision framework: pick a kit for speed and simplicity. Choose custom when specific beams, materials, or scene control matter. Always check transformer capacity, fixture durability, and whether the products’ style matches your home before committing.
How to Install Low-Voltage Landscape Lighting Step by Step

A nighttime dry run reveals how each fixture shapes the space and whether path coverage is even. Do this before you dig so you can tweak placement, beam angles, and glare while moves are quick and simple.
Dry-fit the full layout at night
Set each fixture where you plan to install it and power the line temporarily. Walk along paths to check pools of light and shadow. Adjust spacing until the route reads evenly without bright streaks or dark gaps.
Mounting fixtures and protecting plantings
Stagger path lights instead of aligning them directly across to avoid an “airport runway” look. Stake fixtures firmly and leave access for future service. Avoid root zones and irrigation lines when placing stakes and anchors.
Run and hide cable cleanly
Route cable along bed edges and tuck it under mulch. Run lines around hardscape edges and behind planting beds to stay tidy. Keep cable runs short when possible to reduce voltage loss.
Make connections and test as you go
Use waterproof connectors and test each light before final backfill. Testing helps you find a bad connector, reversed polarity, or a damaged conductor early so fixes are quick.
Set the transformer and controls
Mount the transformer in a dry, accessible spot. Connect runs, set the timer or photocell, or pair smart controls via the app. If your unit supports multiple taps, create zones for paths and accents.
Final aiming and layering adjustments
Refine accent angles, soften hotspots, and confirm comfortable glare control for seating and windows. Layer uplight and downlight to add depth and finish the design for balanced evening scenes.
| Step | Key action | Why it matters |
|---|---|---|
| Dry-fit at night | Place and power fixtures temporarily | Shows real beam patterns and glare |
| Mounting | Stake securely; protect roots/irrigation | Keeps fixtures stable and serviceable |
| Cable routing | Tuck cable under mulch; skirt hardscape | Prevents trips and reduces wear |
| Test & controls | Test each light; set timer or app | Isolates issues early and automates use |
Safety, Reliability, and Long-Term Performance
Durable materials and smart routing cut repairs and keep your yard reliably lit night after night.
Reduce trip hazards and protect cable runs
Route cable along bed edges and under mulch to avoid tripping. Where the wire crosses drive edges or paths, bury or shield it with conduit or protective trenching.
Anchor fixtures so stakes cannot be dislodged by mowers or foot traffic. Protect lines near tools and irrigation with rigid covers.
Choose weather-resistant finishes
Spend more on materials that resist corrosion. Brass and bronze finishes hold up better in wet, salty, or acidic soils and cut long-term repair needs.
Prevent voltage drop with smarter layouts
Keep runs short and split circuits into multiple runs from the transformer. Use heavier-gauge cable for longer spans to preserve brightness at the end of the line.
Simple maintenance routines
Wipe lenses, clear debris, and re-seat waterproof connectors after storms. Replace worn connectors and inspect fixtures seasonally to maintain consistent illumination.
| Action | Benefit | Quick Tip |
|---|---|---|
| Protect or bury cable | Fewer trips and damage | Use conduit at crossings |
| Choose brass/bronze fixtures | Longer life in weather | Pay more now, save later |
| Split runs & heavier cable | Reduce voltage loss | Plan runs by zone |
| Seasonal checks | Consistent illumination & security | Inspect after storms |
Reliable performance ties back to buyer choices: quality fixtures, connectors, and metal finishes reduce service calls. Consistent, dependable lighting also supports home security by keeping dim areas illuminated night after night.
Conclusion
Wrap up your project by confirming the plan, the right fixtures, and careful aiming so each area reads as intended at night.
Good results come from planning first, picking compatible fixtures and a proper transformer, then testing and adjusting on site. Treat the system as a whole: layout, cable runs, and connections matter as much as the look of the fixtures.
Re-check priorities: mark paths for safe navigation, pick accents for focal points, and use layered approaches to add depth. Choose a kit if you want a fast start, or build custom runs when beam control and finishes matter most.
Next steps: measure zones, count fixtures, total wattage, select controls, and leave room for future additions. Investing in durable parts and smart planning reduces upkeep and gives a polished low voltage landscape lighting result for years to come.