Have you ever wondered if there is a faster way to achieve a golf-course-quality lawn without the back-breaking labor of traditional seeding? Many homeowners deal with patchy growth and lost seeds during heavy rain. Modern hydroseeding offers a helpful solution that turns bare dirt into a lush green space.
This method began in the 1930s when Charles Finn looked for a professional way to plant grass. He wanted to stop the wind and rain from washing away his expensive seeds. This invention changed the landscaping industry by making the process much more efficient.
Today, this technique works for more than just a typical residential yard. It is a top choice for massive projects like highways, sports fields, and golf courses. You can now use these same industrial benefits to help your own property.
This method saves you significant time while ensuring your yard grows thick and healthy. Our guide explains how hydroseeding makes professional results accessible for any homeowner. Learn why this revolutionary approach is the preferred choice for your next outdoor project.
- Hydroseeding provides a uniform and cost-effective alternative to hand-seeding, preventing common issues like seed loss from wind or runoff.
- Developed in the 1930s, this versatile technique is effective for everything from small home lawns to massive industrial landscapes.
What is Hydroseeding and How Does It Work?

Understanding how a liquid seed mixture transforms bare ground into a lush carpet of grass is essential for homeowners. This method provides a fast and uniform way to establish a new lawn compared to traditional hand seeding. It uses a specialized tank to spray a specific mix that encourages rapid growth across your property.
The History and Evolution of Hydroseeding
Hydroseeding dates back to the 1930s when Charles Finn sought to fix the problems of manual seeding. He developed a way to spray seeds over large areas to improve efficiency and consistency. This innovation eventually evolved into the modern process used today for residential yards and erosion control.
In the early days, the method used simple equipment to spread a basic mix of straw and water. Today, advanced machinery ensures that every square inch of soil receives the perfect amount of nutrients. Modern systems can cover steep slopes and massive fields with incredible precision.
Understanding the Hydroseed Slurry Mixture
The core of this technique is the slurry, a thick blend of water, seeds, and fertilizer. It also includes mulch, which acts as a protective blanket for the grass seed. Mechanical paddles inside the tank provide constant agitation to keep the mixture consistent during the entire application.
| Component | Primary Purpose | Key Benefit |
|---|---|---|
| Wood Mulch | Moisture Retention | Protects seeds from drying out |
| Fertilizer | Nutrient Boost | Speeds up initial growth |
| Green Dye | Visual Guide | Ensures even coverage |
| Water | Hydration | Starts the germination process |
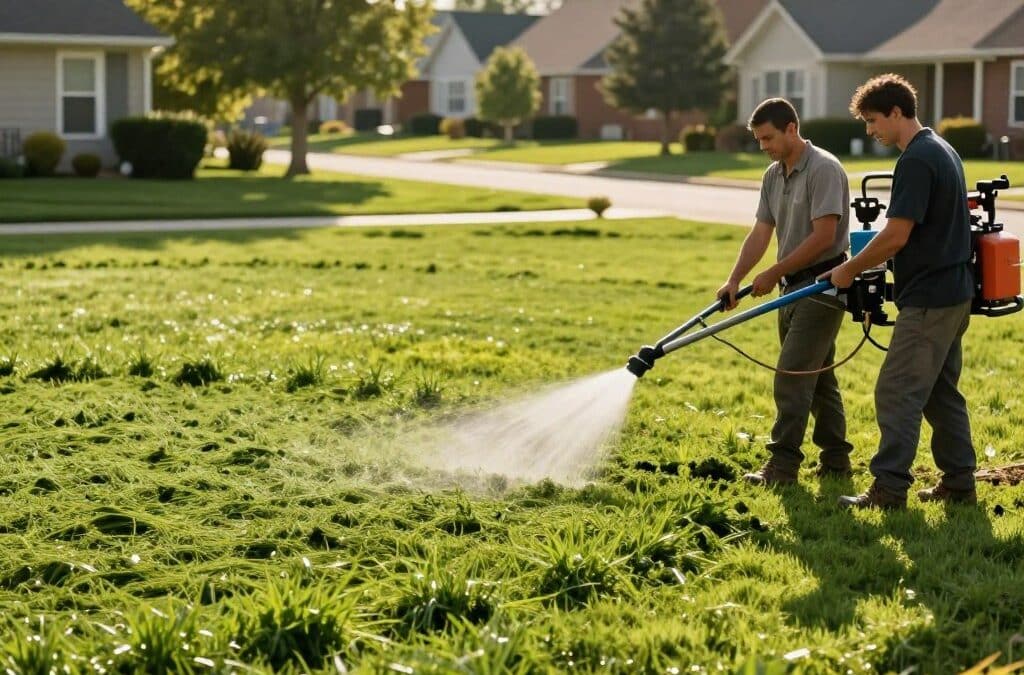
The Application Process: From Tank to Lawn
Powerful pumps spray the hydroseed mixture onto the soil under high pressure. The slurry contains a green dye that helps the operator see exactly where the ground is covered. This ensures no spots are missed and prevents wasteful overlap during the application.
This high-pressure spray allows the mixture to bond with the soil surface immediately. It creates a stable environment that resists erosion from light wind or rain. The even distribution of the slurry ensures that your lawn will grow without patchy or bare spots.
Germination Timeline and Results
You can expect to see results quite quickly with this efficient planting method. While a new lawn might start to sprout in just one week, full germination typically takes two to three weeks. Optimal weather and proper watering help speed up this natural time frame.
The protective mulch layer maintains the moisture levels critical for healthy plant development. Because the mixture bonds so well to the earth, it prevents the seed loss common with traditional methods. Within a few weeks, the individual blades fill in to create a thick and vibrant landscape.
Benefits and Drawbacks of Hydroseeding

Deciding on the best way to green up your yard involves weighing the pros and cons of the hydroseeding process. This method offers a unique balance of speed and affordability for modern landscaping projects.
Key Advantages of the Spray Method
The process allows a new lawn to sprout quickly, often within one to two weeks. It is usually much more affordable than sod, making it a popular choice for homeowners who want professional quality on a budget.
You can also create custom seed blends. This flexibility helps you get healthy lawns that thrive in your specific shade and soil conditions.
Potential Challenges and Limitations
One major drawback is the water requirement. Newly sprayed areas need significantly more water than established sod during the first thirty days.
While the cost is low for big projects, it might be higher for very small yards. Equipment minimums can impact the total cost for tiny patches of grass.
| Installation Method | Relative Cost | Growth Speed |
|---|---|---|
| Hydroseeding | Moderate | 1-2 Weeks |
| Sod | High | Instant |
| Traditional Seed | Low | 3-4 Weeks |
When This Option is the Best Choice
This approach provides uniform results over large areas very efficiently. It is the ideal solution for new home construction or renovating large lawns.
It also works wonders for erosion control on steep slopes. If you want a lush lawn without the high price of instant grass, hydroseeding is often the best path.
Hydroseeding vs. Sod vs. Traditional Seeding

When you want a green yard, you must choose between instant sod, versatile hydroseeding, or basic hand seeding. Each path offers a unique balance of speed, expense, and long-term vitality. Selecting the right path for your landscape means looking closely at how each choice impacts your soil health.
Comparing Installation Speed and Results
Sod provides an almost instant transformation for your property and works during any season. This speed comes with a high cost and requires very frequent watering to survive the initial transition. In contrast, hydroseeding provides visible results within one to two weeks.
| Feature | Hydroseeding | Sod | Traditional Seeding |
|---|---|---|---|
| Installation Speed | 1-2 Weeks | Instant | Several Months |
| Investment Level | Moderate | Very High | Lowest |
| Root Development | Deep and Strong | Shallow/Weak | Moderate |
| Customization | Full Control | Limited | Full Control |
This pressurized method applies a uniform mixture that covers the ground quickly and efficiently. While hand seeding is effective for very small spots, it is time-consuming and often leads to patchy growth. Hydroseeding applies all materials simultaneously to ensure the coverage remains even across the entire space.
Root Development and Lawn Health Differences
Hydroseeding provides total control over the grass seed varieties used in the mix. You can select specific blends that thrive in your local environment and unique soil conditions. Because the seed germinates directly in the ground, the root system grows deep and strong.
Transplanted sod often struggles to establish a deep connection with the existing earth through its roots. This difficulty can lead to disease issues or thin spots over time. By planting seeds directly, you ensure the lawn becomes more resilient against drought and extreme heat.
Cost Analysis: Which Method Saves Money?
Budget often dictates which option a homeowner selects for their property. Sod is the most expensive, often costing two to three times more than other professional choices. Traditional seeding is the less expensive route but demands the most patience and manual work.
Hydroseeding offers a professional-grade lawn at a price that fits most budgets. It balances affordability with high-quality, uniform coverage for a beautiful home landscape. Choosing this path provides a durable surface without the extreme final cost of alternative mats.
How Much Does Hydroseeding Cost?

Investing in a lush landscape requires understanding the financial commitment involved with various turf establishment methods. Most homeowners find that the average rate for professional services provides a balance between speed and budget.
Price Per Square Foot Breakdown
The average price for professional application in the United States typically falls between $0.21 and $0.26 per square foot. Some regional markets may offer rates as low as $0.05 to $0.20 per square foot for basic services.
Larger properties often benefit from economies of scale. For instance, a residential yard measuring between 6,000 and 10,000 square feet generally requires a budget of $1,500 to $2,600.
| Method | Rate Per Square Foot | Rate Per Acre |
|---|---|---|
| Traditional Seeding | $0.02 | $680 – $1,050 |
| Hydroseeding | $0.05 – $0.26 | $2,000 – $4,000 |
| Sod Installation | $0.30 – $0.83 | $13,068 – $36,154 |
Cost Factors: Materials, Labor, and Equipment
The specific price of your project fluctuates based on the quality of the slurry components. High-quality materials like premium wood fiber mulch or specialized fertilizers increase the overall investment.
Labor also plays a significant role in the total bill. If the land has steep slopes or difficult terrain, the time and equipment needed to cover the area will rise accordingly.
Comparing DIY vs. Professional Service Costs
Attempting a DIY application might seem like a way to save money, but the rental fees for machinery add up quickly. Renting a 300- or 600-gallon machine typically costs a few hundred dollars for just one day.
While doing it yourself avoids labor fees, professional services are often less expensive for a small yard when you factor in the purchase of quality seed and mulch. Professionals also ensure the new lawn receives even coverage and the correct nutrient mix for growth.
Types of Hydroseeding Mulches and Their Applications

Mulch acts as a protective blanket for your grass seeds, but not every variety is built the same. The specific material you choose affects how well your lawn survives the early stages of growth.
It holds moisture against the seed and prevents wind from blowing your investment away. Selecting the correct type ensures the mixture stays in place until the roots take hold.
Wood Fiber Mulch: Premium Performance
Wood fiber mulch stands out as a premium choice for high-quality lawn projects. It offers superior moisture retention and provides excellent erosion control compared to lighter materials.
This fiber creates a heavy, strong matrix that shields emerging seedlings from harsh temperatures. It stays in place during rain, making it a reliable choice for professional results.
Paper Mulch: Budget-Friendly Option
If you need a cost-effective solution, paper mulch is the most budget-friendly option available for hydroseeding. Manufacturers create this product from recycled newspaper, which makes it very easy to spray.
However, it is more vulnerable to erosion because it is much lighter than wood. You must keep it wet to prevent it from hardening into a crust that blocks grass growth.
Blended Mulch: Balanced Effectiveness
Blended mulch offers a middle-ground solution for many homeowners. It usually contains a 70% wood fiber and 30% paper mixture.
This combination provides better performance than paper alone while remaining more affordable than pure wood fiber. It is an ideal type for flat residential yards with moderate weather conditions.
Bonded Fiber Matrix for Steep Slopes
Bonded Fiber Matrix (BFM) is the highest-performance product for challenging hydroseeding landscapes. It works best on steep slopes or creek beds where erosion poses a major threat.
This process uses water-resistant bonding agents to create a tight, protective layer over the soil. This specific fiber offers the highest level of erosion control possible for difficult terrain.
| Mulch Category | Primary Composition | Erosion Resistance | Best Application |
|---|---|---|---|
| Wood Fiber | 100% Wood Fiber | High | Professional Lawns |
| Paper Mulch | Recycled Newspaper | Low | Flat, Level Areas |
| Blended Mulch | 70% Wood / 30% Paper | Moderate | Residential Yards |
| Bonded Fiber Matrix | Fiber with Bonding Agents | Maximum | Steep Slopes & Banks |
Selecting the Right Grass Seed for Your Region
To ensure your hydroseeding project succeeds, you must first identify which grass seed thrives in your specific geography. Picking the right seed is the most vital step in establishing a healthy landscape. You should select high-quality seeds that match your local weather patterns and soil conditions.
Cool-Season Grass Varieties for Northern Climates
Northern areas usually require cool-season varieties to survive harsh winters. These plants thrive best when temperatures stay between 60 and 75°F. Kentucky bluegrass is the most popular choice for homeowners in the Midwest because of its lush texture.
You should also consider fescues or perennial ryegrass for their excellent cold tolerance. These varieties require planting from late summer to early fall. This timing allows roots to establish before the ground freezes.
Warm-Season Grass Types for Southern Areas
Southern regions need a warm-season grass like Bermudagrass or Zoysia to handle intense heat. These types perform best in a hot climate, specifically between 80 and 95°F. Plant this type during late spring or early summer for the best hydroseeding results.
Warm-season varieties often tolerate slightly lower soil pH levels than their northern cousins. Most of these species provide great drought resistance during long, dry summers. They enter dormancy and turn brown only when temperatures drop significantly.
Creating Custom Seed Blends
Mixing different varieties can create a more resilient grass for your property. A custom blend might combine several types to improve overall disease resistance. This approach helps your lawn survive various stresses throughout the entire year.
Specialty Seeds for Shade and High-Traffic Areas
For tricky areas, choose a specialized grass seed that fits the specific environment. Fine fescues work well in shaded areas where sunlight is limited. Tall fescue is the best choice for spots that see heavy foot traffic.
Always check your soil pH before you begin the process. Most grass species prefer a range between 5.8 and 7.2 to absorb nutrients properly. Every specific type has a preferred pH and climate that helps it grow strong.
| Grass Category | Common Variety | Best Planting Time | Preferred pH Range |
|---|---|---|---|
| Cool-Season | Kentucky Bluegrass | Late Summer / Early Fall | 6.0 – 7.2 |
| Cool-Season | Tall Fescue | Late Summer / Early Fall | 5.8 – 7.0 |
| Warm-Season | Bermudagrass | Late Spring / Early Summer | 5.8 – 7.0 |
| Warm-Season | Zoysiagrass | Late Spring / Early Summer | 6.0 – 7.0 |
Preparing Your Lawn for Hydroseeding: Essential Steps
Successful hydroseeding starts long before the slurry hits the ground through careful site preparation. A healthy yard begins with a strong foundation to support growth. This phase ensures your investment yields the best results over the long term.
Step 1: Conduct a Soil Test
Send samples to a professional lab to check for toxicity or acidity common on construction sites. This testing process usually costs between $25 and $50. It provides a roadmap for your lawn’s health.
Testing pH Levels
The ideal soil pH range for most grass is between 6.0 and 7.0. Budget enough time for results, as labs often take two weeks. Correcting these levels is vital for nutrient uptake.
Identifying Nutrient Deficiencies
Detailed reports identify missing minerals so you can choose the right fertilizer. This step ensures the soil provides everything your new seeds need to grow. Without these nutrients, your new growth may struggle.
Step 2: Measure Your Lawn Area
Calculate the square footage of the area to determine how many materials you need to buy. Precise measurements prevent waste and help you plan your budget. This ensures you have enough mixture for even coverage.
Step 3: Clear the Ground Completely
Hydroseeding works best when the mixture touches bare soil. Remove all old plants and dead grass from the surface. A clean slate allows for faster germination.
Removing Debris and Vegetation
Clear away rocks, weeds, and toys from the ground. A clean surface allows for even application of the seed. You want nothing blocking the contact between the mixture and the earth.
Marking Sprinkler Heads
Identify and mark your irrigation components before you start. This prevents damage when you move heavy equipment across the site. Using bright flags makes them easy to see during the spray phase.
Step 4: Grade and Level the Soil
Slope the soil away from buildings to improve water drainage. Keep the dirt about 3 inches below the final desired height. This prevents flooding and ensures a smooth finish for your grass.
| Preparation Stage | Primary Goal | Required Action |
|---|---|---|
| Site Assessment | Analyze Composition | Professional Lab Testing |
| Debris Removal | Create Bare Surface | Clear Rocks and Weeds |
| Final Grading | Ensure Drainage | Level 3 Inches Below Grade |
Step 5: Apply Topsoil, Compost, and Amendments
Add three inches of fresh topsoil and compost to the lawn. Churn this organic matter into the existing soil to help roots grow deep. This creates a nutrient-rich environment for the upcoming application.
Adding Lime or Sulfur for pH Adjustment
Apply lime if the soil is too acidic. Use sulfur if the environment is too alkaline to balance it out. Maintaining this balance is key for long-term survival.
Incorporating Organic Matter
Finish by leveling the surface with a rake to remove any clumps. Proper seeding preparation ensures the hydroseeding results look professional and uniform. A smooth surface is the final touch for a perfect start.
DIY Hydroseeding: Equipment and Application Guide

Mastering the DIY hydroseeding process involves selecting the best tools and following precise mixing ratios. This project allows you to control every step of the lawn renovation while saving money. You must understand how to apply the slurry correctly to ensure even growth.
Selection and Rental Varieties
Choosing the right equipment is the first step toward a lush yard. You can find various options at local stores that cater to different property sizes.
Renting a Hydroseeder
Many local dealers offer a hydroseeder for a few hundred dollars per day. You can typically rent a 300-gallon or 600-gallon unit for your project. This heavy-duty machine makes covering large areas much faster than manual methods.
Purchasing a DIY Hydroseeding Kit
Smaller kits are perfect for a residential lawn under 5,000 square feet. These packages often include basic sprayers and premixed materials. They provide a simple entry point for the seeding process without a large investment.
Building a Homemade Hydroseeder
Skilled homeowners sometimes build their own units using drums and pumps. This approach saves money but takes significant time to assemble correctly. You must ensure the pump is strong enough to handle thick mixtures.
Agitation Systems: Jet vs. Mechanical
The types of agitation in your equipment determine how well the mulch and water combine. Jet agitation uses high-pressure water streams and works well for small tanks. Mechanical agitation uses metal paddles to mix the slurry more thoroughly in larger machines.
Preparing the Slurry: Ratios and Consistency
Creating a consistent mix is vital for professional results. Start by filling the hydroseeder tank three-quarters full with water. Run the agitator for 30 seconds before you add the dry ingredients.
Seed Quantities Per 1,000 Square Feet
You should use 5 to 7 pounds of seed for every 1,000 square feet. This density ensures the grass grows thick enough to crowd out weeds.
Fertilizer and Mulch Proportions
Add 20 pounds of fertilizer and 40 to 50 pounds of mulch for each section. These materials protect the young plants and provide essential nutrients during early growth.
Water Volume Requirements
Proper hydration keeps the mixture fluid so it does not clog the hose. Always check the manufacturer’s guide to confirm the specific water capacity for your model.
Spraying the Mix on Your Yard
The final application stage requires a steady hand and a clear path. Proper technique ensures that every inch of soil receives the same amount of nutrition.
Choosing the Right Weather Conditions
Wait for a calm and cool day before you begin the work. Avoid high winds that might blow the seed away from your target area.
Spray Technique and Coverage
Hold the nozzle at least 3 feet above the ground. Move the hydroseeder spray in a sweeping motion to create an even layer of the green mixture.
Avoiding Gaps and Overlaps
Plan your path to avoid walking on the fresh hydroseed. It is helpful to overlap the edges slightly to prevent bare spots in your new turf.
When to Hydroseed: Timing for Optimal Growth
Success with a hydroseed application depends on hitting the right seasonal patterns. Choosing a good time ensures that your grass seeds grow quickly and build deep roots. Proper timing protects your investment from harsh weather and ensures a lush outcome.
Spring Hydroseeding: Advantages and Considerations
Applying hydroseed in the early spring offers help from natural rain and mild weather. This season provides great conditions for growth before the hot sun arrives. However, spring hydroseeding needs more watering during the subsequent summer months to stay healthy.
Fall Hydroseeding: The Ideal Season
Most experts say that fall is the best season for hydroseeding a new lawn. The soil stays warm, but the air is cool, which protects young grass plants. Seeding in the fall lets the lawn establish itself fully before winter dormancy sets in.
| Region | Optimal Window | Expected Result |
|---|---|---|
| Northern US | Late Aug – Sept | Strong root development |
| Southern US | Sept – Oct | Avoids peak summer heat |
| All Regions | Early Spring | Requires heavy irrigation |
Why to Avoid Summer Hydroseeding
Summer poses many challenges because of high heat and dry weather. You might need to water three times more often to keep the seedlings alive. It is often better to wait for cooler times to save effort and water.
Regional Climate Considerations
Your local climate determines the best time for seeding success. Northern areas favor late summer, while southern regions benefit from an early spring. Always plan your spring hydroseeding early to get the best results for your property.
Maintaining Your Hydroseeded Lawn After Installation
Careful management after the hydroseeding application ensures that your investment turns into a healthy, vibrant landscape. Diligent care during the first thirty days determines the ultimate success of your project.
You must prioritize the health of each seed to achieve full coverage. Following a strict routine will help you avoid bare spots and thinning.
Watering Schedule: First 30 Days
Consistent moisture is the lifeblood of your hydroseed slurry. You need to provide enough water to trigger germination without washing the mixture away.
Frequency and Duration Guidelines
Run your sprinklers two to three times a day for the first month. Each session should last about fifteen minutes to support rapid grass growth.
Keeping the Seed Bed Moist
The upper layer of soil must remain damp at all times. If the seedbed dries out even once, the emerging seedlings could perish.
Protecting Your New Lawn
Fragile seedlings need a disturbance-free environment to thrive. It is vital to protect the area from any external pressure that could damage the tiny roots.
Avoiding Foot Traffic
Homeowners must completely avoid walking on the new lawn for the entire first month. Even light pressure can crush the young plants before they stabilize.
Pet and Child Restrictions
Keep pets and children away from the area during this critical time. Playtime should be moved to a different part of the yard to prevent soil compaction.
First Mowing: Timing and Technique
Wait until the grass reaches a height of three to four inches before the first cut. This typically happens within four to six weeks, depending on your weather conditions.
Always follow the one-third rule by never removing more than one-third of the blade length. This technique keeps the plant strong and healthy.
Fertilization After Hydroseeding
Apply a starter fertilizer or slow-release formula roughly thirty days after installation. This provides the nutrients necessary for long-term development.
Weed Control Timing
Postpone any weed killer applications for three to four months. Young lawns are too sensitive for harsh herbicides, so stick to manual removal if necessary.
| Milestone | Timeline | Action Required |
|---|---|---|
| Initial Sprouting | 1-2 Weeks | Maintain consistent soil moisture |
| First Mowing | 4-6 Weeks | Cut when grass is 3-4 inches tall |
| Nutrient Boost | 1 Month | Apply specialized starter fertilizer |
| Herbicide Use | 3-4 Months | Delay weed control for plant safety |
Hydroseeding for Erosion Control and Special Applications
Beyond making backyards green, hydroseeding offers a powerful solution for stabilizing land disturbed by industrial projects. This sophisticated process is critical for the environment after large construction jobs like roads or bridges. Workers use it to control dust and restore the ground before wind or rain causes damage.
Slope Stabilization and Steep Terrain
Steep terrain often suffers from soil loss during heavy rain. Hydroseeding with bonded fiber matrix mulches provides excellent erosion control on highway embankments and hillside developments. These specialized mixtures stick to the soil, offering better control over shifting ground than traditional methods.
Riverbank and Waterway Protection
Preserving riverbanks is vital to prevent runoff from entering our water systems. This method establishes a thick vegetative cover that guards against erosion and holds the soil in place. By doing so, it helps control sediment levels and keeps waterways clean.
Commercial Landscaping Projects
In commercial landscaping, timing is everything for large areas like retail centers or athletic fields. Developers use this technique for office parks and golf courses because it is fast. It provides a uniform way to distribute seed over a wide area and other commercial areas.
Mine Reclamation and Environmental Restoration
Returning industrial mining sites to their natural state requires expert landscaping techniques. Operators use hydroseeding to establish native grasses and wildflowers in remote areas. This sophisticated restoration process supports ecosystem recovery and prevents long-term erosion problems.
| Application Type | Primary Environmental Goal | Best Mulch Type | Growth Speed |
|---|---|---|---|
| Infrastructure | Dust and Dust Control | Wood Fiber Blend | Very Fast |
| Waterways | Sediment Management | Stabilized Mulch | Fast |
| Commercial | Aesthetic Uniformity | Paper/Wood Mix | Moderate |
| Mining Sites | Habitat Restoration | Bonded Fiber Matrix | Steady |
Conclusion
The path to a thicker, healthier lawn starts with understanding the unique advantages of the hydroseeding process. This method offers faster germination and deeper root systems than traditional seeding or sod. It remains an efficient, cost-effective choice for homeowners who want professional results.
Proper preparation is the foundation of any project. You must focus on soil testing, grading, and selecting the right grass varieties for your specific climate. These essential steps ensure your hydroseeding efforts lead to long-term growth and better soil stability.
Timing your application during the spring or fall allows the grass to thrive in temperate weather. Maintaining consistent moisture and using precise mixing ratios is critical for the seedlings. Whether you choose a DIY approach or hire experts, your careful attention will yield great results.
This versatile solution works for everything from small residential spots to large erosion control projects. Use your new knowledge of slurry mixes to transform your yard with total confidence. Enjoy the lasting value of a healthy lawn through effective hydroseeding.