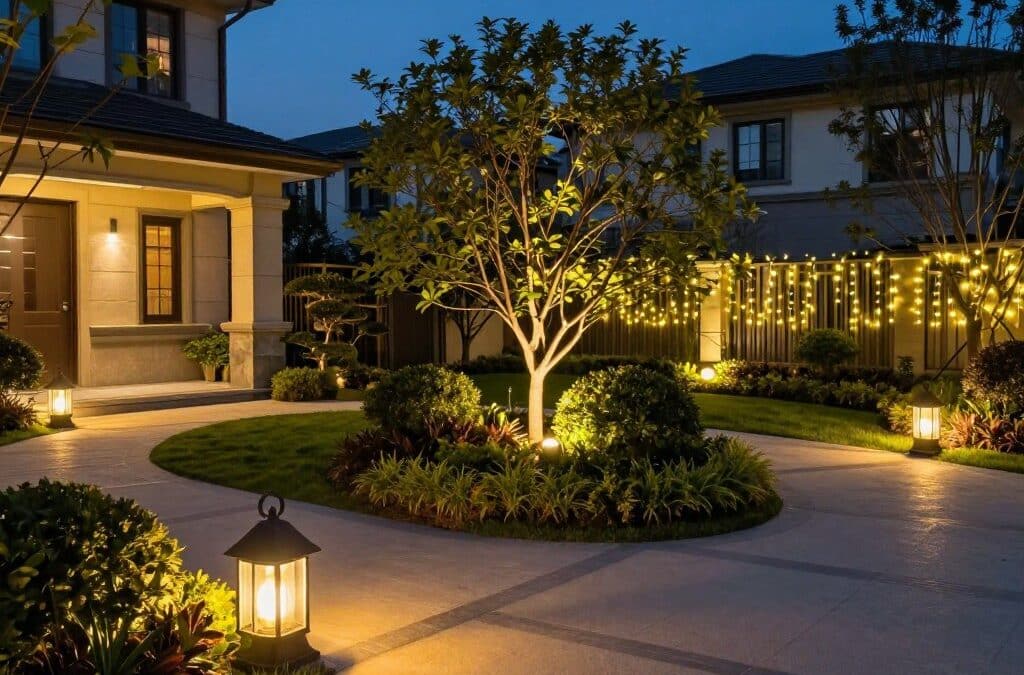
Have you ever wondered why some houses look like luxury resorts while others vanish into the dark? Installing professional landscape lighting transforms your property into a welcoming masterpiece. These fixtures boost your curb appeal and highlight architectural details easily.
Beyond beauty, quality outdoor lighting serves vital needs for any home. It improves safety by clearing shadows and enhances security for your family. Modern systems also let you enjoy your yard long after the sun sets.
- Strategic illumination dramatically improves both property aesthetics and nighttime safety.
- Low-voltage technology offers an energy-efficient way to increase property value.
- Four main fixture types provide versatile solutions for paths, accents, and structures.
Modern garden landscape designs use energy-efficient technology for low utility costs. This approach makes setup accessible while providing high-quality results. It is a smart way to increase home value with durable solutions.
We will examine four main types: path lights, accent spots, step fixtures, and well lights. Each helps build a balanced exterior through strategic placement. This guide provides the steps to achieve success.
Proper installation ensures a reliable system that stays bright for many years. This section previews methods used by DIY fans and seasoned pros. Experience your property in a whole new light.
Why Landscape Lighting Matters for Your Home’s Curb Appeal

Many homeowners invest in outdoor upgrades, but few things provide as much value as a well-planned lighting setup. Quality illumination transforms how visitors perceive your home once the sun goes down. It highlights your hard work while making the entire area more functional for nighttime use.
Safety and Security Benefits
Strategic landscape lighting improves safety by ensuring no one trips or falls on the property. Properly illuminated pathways and steps eliminate dark zones where family members might stumble on uneven terrain. This is especially helpful for guests who are unfamiliar with your garden layout.
Adequate outdoor lighting also deters would-be intruders by removing potential hiding spots around the perimeter. This creates a psychological deterrent that discourages people from approaching well-lit homes. Strategic safety placement provides lasting peace of mind for everyone in the household.
Aesthetic Enhancement of Your Property
A beautiful landscape adds character to your home and boosts curb appeal instantly. Professional landscape lighting highlights architectural features and specimen trees that otherwise disappear after sunset. These fixtures transform ordinary yards into visually striking environments that stand out in the neighborhood.
Strategic lighting can also extend your backyard living space for entertaining. By illuminating garden beds and recreational areas, you effectively expand the functional square footage of your home. A quality landscape allows you to enjoy patios and decks long after the sun sets.
| Feature Type | Primary Benefit | Visual Effect |
|---|---|---|
| Path Lights | Prevents Tripping | Soft Perimeter Glow |
| Spotlights | Accents Architecture | High-Contrast Drama |
| Area Lights | Expanded Living Space | Wide, Even Wash |
Energy Efficiency with Low Voltage Systems
Modern low-voltage systems are incredibly energy-efficient compared to older traditional options. These setups operate at just 12 volts instead of the standard 120-volt household current. This lower voltage makes them inherently safer for homeowners to install and maintain over time.
If you choose an LED system, you will consume a fraction of the electricity required by halogen bulbs. Homeowners often see a reduction in utility bills while enjoying low-voltage performance. Transitioning your landscape to modern lighting ensures long-term reliability and a smaller environmental footprint.
Understanding Low-Voltage Landscape Lighting Systems

Learning the fundamentals of low-voltage landscape technology is the first step toward a glowing yard. These systems provide a safer alternative to the high-powered electrical setups found inside your home. You can create a professional look for your property without needing advanced electrical skills or expensive equipment.
What Makes Low Voltage Different from Standard Wiring
Standard household wiring runs on 120 volts, which can be dangerous if you handle it incorrectly. In contrast, voltage landscape lighting operates on just 12 volts of power. This reduced voltage means there is no risk of a serious electrical shock during installation or seasonal maintenance.
Because the power level is so low, you typically do not need to hire a professional electrician. Most local building codes allow homeowners to work with this type of wiring without special permits. This low-voltage approach makes the project much more affordable and accessible for every homeowner.
Key Components: Transformer, Fixtures, Wire, and Connectors
The heart of any low voltage landscape setup is the transformer. This device converts standard household current into safe power for your outdoor fixtures. You should mount the transformer on an exterior wall at least 12 inches above the ground to protect it from moisture.
The current travels through specialized landscape wire to each light in your garden. This wire features thick insulation designed specifically for direct burial in the soil. You then attach your fixtures using waterproof connectors to ensure the transformer provides a steady flow of power throughout the night.
Why 12-Volt Systems Are Ideal for DIY Installation
A 12-volt voltage landscape setup is incredibly user-friendly for beginners. You can easily move fixtures or add new lighting as your garden grows and changes. Since the voltage of landscape lighting is low, you only need to bury the wire a few inches deep under the mulch.
This flexibility allows you to experiment with different effects throughout your landscape. Using a low-voltage landscape method keeps your monthly energy costs low. It also provides peace of mind since the voltage is safe for children and pets who play in the yard.
A high-quality low-voltage setup offers long-term durability for any property. You can customize the voltage landscape to highlight specific trees, paths, or architectural details. Proper lighting improves your home’s value without the high costs of traditional landscape electrical work. Using low voltage ensures you can maintain the lighting easily, and the wire stays safe even if you nick it while gardening in the landscape.
| Feature | Standard Wiring (120V) | Low Voltage System (12V) |
|---|---|---|
| Safety Level | High shock risk | Extremely safe for DIY |
| Installation Skill | Professional Electrician | Homeowner / Beginner |
| Trench Depth | 18 Inches (with conduit) | 6 Inches (direct burial) |
| Permit Required | Usually Yes | Usually No |
Type 1: Path and Walkway Lighting

Creating a welcoming entrance begins with strategically placed low voltage path lights outdoors to define your home’s landscape. These lights act as a visual guide while preventing tripping hazards for visitors. They illuminate pedestrian routes and create a clear transition from the street to your front door.
Best Placement Strategies for Path Lights
When planning a location for each fixture, try alternating them in a staggered pattern along the walkway. This creates an attractive rhythm and effectively conserves your fixtures. Always mark each location with a small flag or pencil before you begin your installation.
Prepare a sketch that includes the distance between the transformer and the first light. Ensure you position the lighting to hit the walking surface directly. This prevents the glow from shining into the eyes of approaching guests as they walk toward your home.
Spacing Guidelines and Fixture Heights
For standard residential walkways, space your lights eight to ten feet apart for optimal illumination. Closer spacing is often better for curved paths or areas with irregular terrain to eliminate dark shadows. This ensures your landscape remains safe and visible throughout the night.
Most path lighting options stand about 18 to 24 inches tall. This height provides a wide spread of illumination without blocking sightlines across the landscape. Using the right height helps maintain a clean and professional look for your property.
Wiring Considerations for Long Pathway Runs
Long runs require careful planning to avoid voltage drop across the wire. You may need a heavier gauge wire to keep the brightness consistent at the far end of the run. Always calculate your total load before you lay the wire in the ground.
Proper wiring might also involve running cable under a driveway or sidewalk. Using multiple transformer taps can help provide adequate power to every landscape bulb. Secure the wire properly to protect your wiring from accidental damage during future gardening or lawn maintenance.
Type 2: Accent and Spotlight Lighting
Directional fixtures allow homeowners to “paint” their properties with beams of light for a gallery-like effect. This approach focuses on creating dramatic focal points by illuminating specimen trees and garden sculptures.
It turns an ordinary yard into an artistic landscape composition that captures attention all night long. By choosing specific elements to showcase, you guide the eye through the outdoor space with intention.
Highlighting Trees, Shrubs, and Architectural Features
Homeowners use accent and spotlight lighting to draw attention to unique textures and shapes. You can reveal the hidden beauty of a large oak or use shadows to create a mysterious atmosphere.
Techniques like grazing emphasize the rough texture of stone walls by placing the source close to the surface. Silhouetting highlights the bold outlines of your favorite plants against a lit background to create depth in the landscape.
Defining these goals helps you choose the right intensity for each landscape feature. Whether you want a soft glow or a sharp focus, these directional beams provide total creative control.
Proper Angles and Distances for Uplighting
Achieving a natural look requires careful fixture placement. Position your lights at an ideal distance of 2 to 4 feet from the base of the object you want to illuminate.
Aim the beams at angles between 30 and 45 degrees from the ground. This specific tilt helps mimic the soft look of moonbeams filtering through branches rather than creating a harsh, flat appearance.
Fixtures placed too close can create “hot spots” that look unnatural and distracting. Proper spacing ensures the illumination spreads evenly across the foliage or architectural detail.
Load Calculations for Multiple Spotlights
Modern LED units offer excellent performance while using very little power. To keep your system safe, calculate the total wattage by adding the consumption of every single spotlight in the circuit.
Ensure the combined load never exceeds 80% of your transformer’s capacity. This buffer helps maintain a stable, low-voltage flow and prevents the system from overloading during operation.
Using LED options significantly reduces the needed power compared to old halogen bulbs. This efficiency allows you to install more light points without upgrading to a massive, expensive transformer.
Type 3: Step and Hardscape Lighting

Integrating specialized fixtures into your stone or wood structures prevents trips while enhancing evening appeal. These outdoor step lights low-voltage systems transform invisible hazards into highlighted features. They define edges and add a layer of sophistication to your overall landscape.
Step and hardscape lighting focuses on specific zones like retaining walls and patio edges. These lights serve a critical function by marking elevation changes that vanish after sunset. Proper lighting makes these transition points visible and beautiful.
Safety Requirements for Stairway Illumination
Stairway safety is the primary reason for adding these specific fixtures. Best practices suggest you should light every step or at least every third step. This consistent pattern ensures a clear visual definition of the entire walking path.
Position your lights to illuminate the treads without creating a blinding glare. If the light is too bright or angled poorly, it could temporarily blind people walking down. Soft, downward-facing lights are the most effective choice for these spaces.
Installation Methods for Deck and Patio Lighting
The installation process varies depending on your chosen materials. For a wooden deck, you can use recessed fixtures mounted directly into the stair risers. You might also consider post-cap lights integrated into the railing system.
Hardscape projects involving stone or masonry often require drilling into the material. You must use appropriate tools and techniques to avoid damaging permanent features. This careful installation ensures the fixtures look like a seamless part of your landscape design.
Weatherproofing Connections in High-Traffic Areas
Durable connections are vital in areas where people walk or furniture moves. You must use sealed, waterproof connectors rated for wet locations to prevent moisture infiltration. This prevents corrosion and stops the landscape system from failing over time.
In areas with high traffic, consider using conduits or protective covers for extra protection. Properly securing all wire connections keeps the system safe from physical contact or snow accumulation. This attention to detail ensures your outdoor lighting remains functional through every season.
Type 4: Well and Downlighting

Well and downlighting offer specialized solutions for those seeking unique visual effects in their yard. These methods provide high-impact visuals by placing sources directly in the earth or high above the property. Adding this layer of landscape lighting creates a professional and sophisticated atmosphere for any home.
In-Ground Well Light Applications
Well lights are ruggedized, in-ground fixtures that remain flush with the ground. These lights withstand heavy soil moisture and even vehicular traffic in driveway applications. Use them to create powerful upward beams that highlight tall specimen trees or property perimeters.
Professional designs often hide these units within flower beds or gravel paths. This placement keeps the focus on the architectural features rather than the hardware itself. They provide excellent security and aesthetic appeal without cluttering the flat areas of your lawn.
Mounting Downlights on Trees and Structures
Downlighting creates a gentle “moonlight” effect by casting rays downward from an elevated position. Mount these fixtures high in tree canopies or along building eaves. This installation produces a natural look as light filters through branches onto the ground below.
Avoid using rigid brackets that might girdle and damage growing branches. Instead, use adjustable mounting straps that expand naturally as the tree matures. This method protects your living landscape while maintaining a stunning visual effect throughout every season.
Special Wiring Concerns for Buried Fixtures
The long-term success of your lighting depends on proper wiring burial depth. Ensure you keep the wire between 6 and 12 inches beneath the ground surface. If the line is too shallow, common gardening tools can easily slice through the insulation.
Conversely, a buried line deeper than 12 inches may encounter underground water reservoirs. This constant moisture exposure causes rust and short circuits over time. Always use waterproof connectors for every buried connection to protect your investment from the elements.
Follow local regulations to ensure your wiring remains safe and functional for years. Heat management is also vital for in-ground units due to their enclosed nature. Use appropriate lamp wattage to prevent overheating within the fixture housing and surrounding soil.
How to Wire Landscape Lighting: Step-by-Step Installation Guide

Transforming your dark yard into a nightly masterpiece requires a solid understanding of low-voltage landscape lighting wire. This comprehensive guide provides step-by-step instructions to help you install landscape lighting with confidence. Following these methods ensures a professional look that lasts for years.
Step 1: Plan Your Layout and Calculate Wire Runs
Every successful project begins with a detailed plan on paper. Sketch your property and mark the exact location of each fixture and the power source. Use a measuring tape to determine the distance between lights and the transformer.
Add 20% extra cable to your total measurement before purchasing supplies. This extra length accounts for curves, obstacles, and future adjustments in your yard. Proper planning prevents you from running out of materials mid-way through the installation.
Step 2: Select the Right Wire Gauge and Length
Selecting the correct thickness for your wires is vital for a bright system. Wire gauge determines how much current can travel through the line without losing power. Thicker wires have lower gauge numbers and provide better performance over long distances.
Understanding 12-Gauge vs. 14-Gauge vs. 16-Gauge Wire
For most residential yards, 14-gauge wire is a reliable choice for runs up to 100 feet. Larger properties or systems with many fixtures benefit from 12-gauge cable to carry more power. Only use 16-gauge options for very short runs under 50 feet with minimal LED fixtures.
Calculating Total Wattage and Distance
Add up the individual wattage of every light on the run to find your total load. Multiply this total wattage by the distance in feet from the transformer. If the final number exceeds 10,000, you should split the run or upgrade to a 10-gauge wire.
Step 3: Install and Connect the Transformer
Mount the transformer at least 12 inches above the ground level near a GFCI outlet. This height protects the unit from moisture and heavy rain splashes. Strip the insulation from the end of your main landscape wire to expose the copper.
Insert the wires into the output terminals on the bottom of the transformer. Tighten the screws to create secure connections for the 12-volt AC current. Since this is low voltage, you do not need to worry about positive or negative polarity.
Step 4: Run and Connect the Landscape Wire
Lay the cable along the ground following your planned route to each fixture. Leave about 24 inches of slack at every light to allow for easy repositioning later. This extra slack helps you avoid stressful wiring repairs if you decide to move a lamp.
Using Pierce Connectors for Quick Installation
Pierce-style connectors are the fastest way to install landscape lighting. These devices snap over the main cable and push sharp prongs through the insulation to reach the copper. They work well for beginners who want to test different yard layouts quickly.
Creating Splice Connections for Permanent Installations
For a more durable system, use waterproof splice connections at every fixture location. Cut the main line and join the wires using grease-filled wire nuts or heat-shrink tubing. This method offers the best protection against moisture and soil corrosion over time.
Step 5: Bury the Wire Properly
Once your lights are connected, you must protect the electrical lines from the elements. Use a flat spade to create a narrow trench along your cable path. Keeping the lines hidden improves your home’s aesthetic and safety.
Recommended Burial Depths (6-12 Inches)
Place your low voltage landscape lighting wire in a trench at least 6 inches deep. In high-traffic areas, a deeper 12-inch burial prevents damage from lawn aerators or sharp edgers. Always pack the soil firmly after you install landscape lines to prevent tripping hazards.
Running Wire Under Sidewalks and Driveways
Hardscapes require special techniques to avoid damaging your concrete or stone. Use a protective PVC conduit to slide the cable beneath walkways or driveways. This conduit prevents the wire from being crushed by the weight of vehicles or shifting ground.
Step 6: Test Your System Before Final Burial
Plug in the transformer and turn the system on before you fill the trench with soil. Check each light to ensure the voltage is consistent across the entire run. Look for any dim fixtures that might indicate a voltage drop issue.
Inspect every connector to ensure no bare copper is visible to the wet ground. Apply electrical tape to pierce connectors for an extra layer of moisture defense. Testing at this stage saves time by catching errors before they are buried under the yard.
Best Practices for Long-Lasting Landscape Lighting

A successful landscape illumination project depends on long-term reliability and smart installation choices. Taking the time to use the right materials prevents costly repairs later. These professional methods protect your investment from harsh outdoor elements.
Durability starts with the foundation of your power delivery. By focusing on high-quality components during your initial installation, you ensure your system remains functional for years. Proper planning reduces the risk of electrical failure and keeps your yard glowing safely.
Choosing Weather-Resistant, Direct-Burial Rated Wire
You should always use a high-quality landscape wire with a UV-resistant PVC jacket. This specific type of wire is rated for safety and designed to sit directly in the soil. Quality insulation prevents damage from moisture and shifting ground temperatures.
Verify that your chosen cable is UL-listed for burial before you start digging. Using a properly rated conductor ensures your exterior lighting survives heavy rain and freezing temperatures. Durable copper wire provides the best conductivity for long-term power needs.
Proper Sealing and Waterproof Connector Selection
Moisture is the biggest enemy of outdoor electrical systems. Use weatherproof connectors like gel-filled wire nuts to keep water away from individual wires. These tools prevent the corrosion that often causes flickering or dead fixtures.
You can also use heat-shrink crimp connectors that create a tight seal when you apply heat. These permanent connections are ideal for connecting wires in high-traffic areas. This step ensures your electrical path remains secure even if the ground moves over several seasons.
| Connector Type | Main Benefit | Ideal Application |
|---|---|---|
| Gel-filled | Excludes moisture | Direct burial use |
| Heat-shrink | Watertight seal | Permanent joins |
| Crimped | High strength | Stable voltage runs |
Avoiding Voltage Drop in Your System
To stop a significant voltage drop, limit your wattage load to 150 watts per run. Divide your layout into distance zones where fixtures are at similar distances from the transformer. This strategy helps maintain a consistent brightness across the entire property.
If you have many lights in one area, split them into two separate runs. Designing your layout this way ensures each fixture receives the correct voltage for peak performance. Consistent power delivery also extends the life of your LED bulbs.
Maintenance Tips and Seasonal Checks
Perform regular maintenance by cleaning your fixtures and checking their aim every few months. Inspect your electrical connections to ensure they remain dry and free of debris. Tighten any loose fittings to prevent water from entering the housing.
Adjusting your timer settings twice a year helps the lights follow the changing sunset times. Finally, test the output voltage at the end of your wire runs to catch hidden issues early. This proactive approach keeps your landscape setup shining brightly through every season.
Conclusion
Elevating your property with strategic illumination is a rewarding endeavor for any modern homeowner. Integrating path, accent, step, and well lights creates a balanced landscape lighting system for your property. This variety ensures every corner of your yard looks intentional and beautiful during the evening hours.
Successful lighting installation blends visual charm with essential safety benefits for your family. You can transform your home and its curb appeal while making dark walkways much more secure for visitors. These functional systems protect your family and guests long after the sun goes down.
Low voltage systems make it simple to install professional-grade fixtures without needing an expert. You should start your project with a clear map of your specific design goals and landscape features. Identify which areas need safety light and which spots deserve a dramatic spotlight to stand out.
Focus on technical details like wire gauge and burial depth for a lasting lighting installation. Using high-quality waterproof connectors keeps the outdoor electrical components safe from moisture and wet soil. This careful planning prevents common issues like voltage drop that can dim your distant bulbs.
Investing time in this project now provides years of reliable performance and great nighttime enjoyment. A well-executed landscape lighting setup boosts property value and highlights your unique landscape architecture. You will enjoy a stunning, illuminated space through every season of the year.